Ingredients
For the Cake Layers:
- 2 ¾ cups all-purpose flour
- 2 cups granulated sugar
- 1 cup unsweetened cocoa powder
- 2 teaspoons baking powder
- 1 ½ teaspoons baking soda
- 1 teaspoon salt
- 3 large eggs
- 1 ¼ cups buttermilk
- 1 cup vegetable oil
- 2 teaspoons vanilla extract
- 1 cup hot water
For the Frosting:
- 1 cup unsalted butter, softened
- 4 cups powdered sugar
- 1 teaspoon vanilla extract
- 2–3 tablespoons heavy cream
- Black gel food coloring (optional, for a darker effect)
For the Blood Drip Effect:
- ½ cup white chocolate chips
- ½ cup heavy cream
- Red gel food coloring (for the blood effect)
For the Skull Decorations:
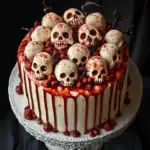
- 12–14 meringue or white chocolate skulls (you can buy skull molds or make your own—more details in the variations below)
Optional Add-Ins and Variations:
- Flavor extracts: Swap vanilla for almond, orange, or peppermint for a flavor twist.
- Alternative cake flavors: Use red velvet, vanilla, or even pumpkin spice cake instead of chocolate for different variations.
- Edible glitter: Add black or silver edible glitter for a shimmering haunted look.
- Candy eyes: Place candy eyes in some of the skulls for an even creepier vibe.
Instructions
Step 1: Bake the Cake Layers
1. Preheat the Oven:
Preheat your oven to 350°F (175°C). Grease and flour three 8-inch round cake pans or line them with parchment paper to prevent sticking.
2. Mix the Dry Ingredients:
In a large mixing bowl, whisk together the flour, sugar, cocoa powder, baking powder, baking soda, and salt until well combined.
3. Mix the Wet Ingredients:
In a separate bowl, whisk together the eggs, buttermilk, vegetable oil, and vanilla extract until smooth.
4. Combine Wet and Dry Ingredients:
Gradually add the wet ingredients to the dry mixture, stirring until just combined. Pour in the hot water and stir until the batter is smooth. The batter will be thin, but this is what makes the cake layers extra moist.
5. Bake the Cake Layers:
Divide the batter evenly between the prepared cake pans. Bake for 30-35 minutes or until a toothpick inserted into the center comes out clean. Remove the cakes from the oven and allow them to cool in the pans for 10 minutes before transferring them to a wire rack to cool completely.
Step 2: Make the Frosting
1. Beat the Butter:
In a large bowl or stand mixer, beat the butter on medium speed until light and creamy, about 2-3 minutes.
2. Add the Powdered Sugar:
Gradually add the powdered sugar, 1 cup at a time, beating on low speed until incorporated. Once all the powdered sugar is added, increase the speed to medium-high and beat until fluffy, about 2 minutes.
3. Add the Vanilla and Cream:
Add the vanilla extract and 2 tablespoons of heavy cream. Beat for another minute. If the frosting is too thick, add an additional tablespoon of cream until it reaches your desired consistency.
4. Optional: Add Food Coloring:
If you want a more dramatic look, add black gel food coloring to the frosting. Start with a few drops and mix until you achieve a deep, dark shade.
Step 3: Assemble the Cake
1. Level the Cake Layers:
Once the cake layers are completely cooled, use a serrated knife to level the tops if necessary, ensuring each layer is flat.
2. Stack the Layers:
Place one cake layer on a cake board or serving plate. Spread a generous layer of frosting on top, then place the second cake layer on top. Repeat the process with the third layer.
3. Crumb Coat the Cake:
Apply a thin layer of frosting over the entire cake to trap any crumbs. This is known as a crumb coat. Refrigerate the cake for 20-30 minutes to allow the crumb coat to set.
4. Frost the Cake:
Once the crumb coat is set, apply a thicker layer of frosting, smoothing it out with an offset spatula or bench scraper for a clean finish.
Step 4: Create the Blood Drip Effect
1. Heat the Cream:
In a small saucepan, heat the heavy cream over medium heat until it just begins to simmer (but not boil).
2. Melt the White Chocolate:
Pour the hot cream over the white chocolate chips in a heatproof bowl. Let it sit for about 2 minutes, then stir until smooth and fully melted.
3. Add Food Coloring:
Add several drops of red gel food coloring to the melted chocolate and stir until the mixture resembles bright red blood. You can adjust the intensity of the color by adding more food coloring.
4. Drip the Blood:
Using a spoon, carefully drip the red chocolate mixture around the edges of the frosted cake, allowing it to drip down the sides for a gory effect. You can also spoon some “blood” onto the top of the cake for a dramatic pool of red.
Step 5: Decorate with Skulls
1. Add the Skull Decorations:
Arrange the meringue or chocolate skulls on top of the cake, clustering them in the center to create the “Sign From Above” effect. Let them cascade slightly down the sides of the cake for a piled-up look.
2. Add Additional Decorations:
If you’d like, you can pipe small rosettes of frosting around the skulls or add a sprinkle of edible black glitter for extra drama. You can also place candy eyes or small bones around the base of the cake for added Halloween flair.
Step 6: Chill and Serve
Refrigerate the cake for 20-30 minutes to set the frosting and chocolate drip. When ready to serve, slice into your spooky creation and enjoy!
- Prep Time: 1 hour
- Cook Time: 35-40 minutes (for baking the cake)
Nutrition
- Serving Size: One slice of cake
- Calories: 450 kcal
- Sugar: 45g
- Fat: 18g
- Carbohydrates: 60g
- Protein: 5g
