Ingredients
For the Chocolate Chip Cookies:
- 2 ¼ cups all-purpose flour
- 1 teaspoon baking soda
- ½ teaspoon salt
- 1 cup unsalted butter, softened (2 sticks)
- ¾ cup granulated sugar
- ¾ cup packed brown sugar
- 1 teaspoon vanilla extract
- 2 large eggs
- 2 cups semi-sweet chocolate chips
For the Spider Decoration:
- ½ cup semi-sweet chocolate chips (for the spiders)
- 2 tablespoons heavy cream or milk (to thin the chocolate)
- Mini chocolate chips (for the spider “heads”)
Instructions
Step 1: Preheat the Oven and Prep the Baking Sheets
Preheat your oven to 350°F (175°C). Line two baking sheets with parchment paper or silicone baking mats to prevent the cookies from sticking and to ensure even baking.
Step 2: Mix the Dry Ingredients
In a medium bowl, whisk together the flour, baking soda, and salt. Set this dry mixture aside while you prepare the wet ingredients.
Step 3: Cream the Butter and Sugars
In a large mixing bowl, using a hand mixer or stand mixer fitted with the paddle attachment, beat the softened butter, granulated sugar, and brown sugar together on medium speed until light and fluffy—about 2-3 minutes. The mixture should be pale and creamy.
Step 4: Add the Eggs and Vanilla
Beat in the eggs one at a time, making sure each egg is fully incorporated before adding the next. Add the vanilla extract and mix until combined.
Step 5: Combine the Wet and Dry Ingredients
With the mixer on low speed, gradually add the dry ingredients to the wet ingredients. Mix just until combined—don’t overmix, as this can result in tough cookies. You want the dough to be soft and slightly sticky.
Step 6: Fold in the Chocolate Chips
Using a spatula, gently fold in the 2 cups of chocolate chips. Make sure the chips are evenly distributed throughout the dough.
Step 7: Scoop the Cookie Dough
Using a cookie scoop or tablespoon, drop rounded balls of dough onto the prepared baking sheets, spacing them about 2 inches apart. Each cookie should be about 1 ½ to 2 tablespoons of dough.
Step 8: Bake the Cookies
Bake the cookies for 10-12 minutes, or until the edges are golden and the centers are set but still soft. You want the cookies to stay chewy, so avoid overbaking them. Once done, remove the baking sheets from the oven and allow the cookies to cool on the sheets for 5 minutes before transferring them to a wire rack to cool completely.
Step 9: Prepare the Spider Decoration
While the cookies are cooling, prepare the melted chocolate for the spider decoration. In a small microwave-safe bowl, melt the ½ cup of chocolate chips in 30-second intervals, stirring between each interval until smooth. If the chocolate is too thick, stir in 1-2 tablespoons of heavy cream or milk to thin it out. You want the chocolate to be smooth and easy to pipe.
Step 10: Create the Spiders on the Cookies
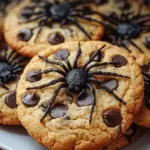
Once the cookies have cooled completely, it’s time to decorate! Using a small piping bag or a ziplock bag with a tiny corner snipped off, pipe a small dot of melted chocolate in the center of each cookie. This will be the spider’s body. Next, place a mini chocolate chip on top of the melted chocolate dot to create the spider’s head.
Using the piping bag, draw 8 thin legs extending from the spider’s body, 4 on each side. Don’t worry about making them perfect—these spooky spiders are meant to be fun and festive, not precise.
Step 11: Let the Chocolate Set
Once you’ve decorated all the cookies, let the melted chocolate set completely. You can speed up this process by placing the cookies in the fridge for about 10 minutes.
Step 12: Serve and Enjoy
Your spider Halloween chocolate chip cookies are now ready to enjoy! Serve them at your Halloween party, pack them in lunchboxes, or simply enjoy them with a glass of milk. These cookies are sure to be a hit with both kids and adults alike.
- Prep Time: 15 minutes
- Cook Time: 10-12 minutes
Nutrition
- Serving Size: 1 cookie
- Calories: 200 kcal
- Sugar: 18g
- Fat: 9g
- Carbohydrates: 28g
- Fiber: 1g
- Protein: 3g
