Ingredients
For the Fudge:
- 3 cups semi-sweet chocolate chips (or milk chocolate chips for a sweeter fudge)
- 1 can (14 oz) sweetened condensed milk
- 1/4 cup unsalted butter (cut into small pieces)
- 1 teaspoon vanilla extract
- Pinch of salt
For the Vampire “Blood” Filling:
- 1/2 cup red gel icing or red cake decorating gel
- 1/4 cup strawberry or raspberry jam (for a thicker, more textured filling)
- Red food coloring (optional, to enhance the blood color)
- 1/4 cup corn syrup (for extra gooeyness, optional)
For Decoration:
- Halloween sprinkles (such as black and red sprinkles, or candy eyes)
- Black gel icing (for drawing spiders, bats, or other spooky designs)
- Edible glitter (for a magical, spooky effect)
- Crushed cookies (like Oreos, for a “dirt” effect on top)
Optional Add-Ins:
- White chocolate chips for a black-and-white fudge look
- Chopped nuts (like pecans or almonds) for added crunch
- Candy eyes or gummy fangs for extra vampire-themed fun
- Marshmallows for a fluffier texture
Instructions
Step 1: Prepare the Blood Filling
To make the “vampire blood” filling that oozes out when you bite into the fudge, start by preparing the gooey red center.
1. Mix the Gel and Jam:
In a small bowl, combine 1/2 cup of red gel icing with 1/4 cup strawberry or raspberry jam. Stir the mixture until smooth and evenly combined. If you want a more intense red color, add a few drops of red food coloring and stir until the mixture reaches your desired shade of “blood.”
2. Add Corn Syrup (Optional):
For an extra gooey texture, stir in 1/4 cup of corn syrup. This will help give the blood a thicker, more syrup-like consistency, perfect for oozing out of the fudge.
3. Set Aside:
Once the blood mixture is ready, set it aside while you prepare the fudge.
Step 2: Make the Fudge Base
Now, let’s move on to the rich and creamy chocolate fudge base.
1. Melt the Chocolate:
In a medium saucepan over low heat, combine 3 cups of chocolate chips, 1 can of sweetened condensed milk, and 1/4 cup of unsalted butter. Stir continuously until the chocolate and butter are completely melted, and the mixture is smooth and glossy. Be sure to keep the heat low to avoid burning the chocolate.
2. Add Vanilla and Salt:
Once the chocolate is fully melted, remove the saucepan from the heat. Stir in 1 teaspoon of vanilla extract and a pinch of salt. The vanilla adds depth to the chocolate flavor, while the salt enhances the sweetness of the fudge.
3. Prepare the Pan:
Line an 8×8-inch square baking dish with parchment paper, leaving some overhang for easy removal later. This will make it much easier to lift the fudge out of the pan once it’s set.
Step 3: Assemble the Vampire Fudge
Now it’s time to combine the chocolate fudge with the vampire blood filling for that spooky surprise!
1. Pour Half of the Fudge:
Pour half of the chocolate fudge mixture into the prepared baking dish, spreading it evenly across the bottom with a spatula or spoon. This layer will form the base of the fudge.
2. Add the Blood Filling:
Spoon dollops of the vampire blood filling over the fudge base, spacing them out so each piece of fudge will have a gooey red center. Be generous with the filling to ensure each piece has that oozing effect when you cut into it.
3. Top with Remaining Fudge:
Pour the remaining chocolate fudge mixture over the blood filling, spreading it evenly to cover all of the “blood.” Use a spatula to smooth the top.
4. Chill to Set:
Place the baking dish in the refrigerator and let the fudge chill for at least 2 hours (or overnight) until it’s fully set. The fudge should be firm to the touch, and the blood filling should be nicely hidden inside.
Step 4: Decorate the Fudge
Once the fudge is set, it’s time to get creative with some spooky Halloween decorations!
1. Remove the Fudge from the Pan:
Using the parchment paper overhang, carefully lift the fudge out of the pan and place it on a cutting board.
2. Cut into Squares:
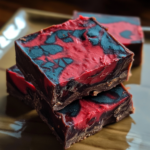
Using a sharp knife, cut the fudge into small squares or rectangles. Try to cut each piece so that some of the “blood” filling is visible inside, giving the appearance of a vampire bite.
3. Add Sprinkles and Decorations:
Top each piece of fudge with Halloween-themed sprinkles, such as black, red, or orange sprinkles. You can also use candy eyes or gummy fangs to give the fudge a vampire-inspired look.
4. Draw with Black Gel Icing:
Use black gel icing to draw spiders, webs, or bats on the surface of the fudge for an extra spooky touch. You can even pipe small drops of icing to resemble bite marks or add a drizzle effect.
5. Dust with Edible Glitter (Optional):
For a magical, spooky look, sprinkle a bit of edible glitter over the top of the fudge. This adds a sparkly touch that will catch the light and enhance the Halloween vibe.
Step 5: Serve and Enjoy!
Now that your Vampire Fudge is fully decorated, it’s ready to serve! Place the pieces on a festive Halloween tray or dish and watch as your guests enjoy the sweet, spooky surprise of the oozing red center. This fudge is perfect for Halloween parties, movie marathons, or as a special treat for trick-or-treaters.
- Prep Time: 15 minutes
- Cook Time: 5 minutes (stovetop cooking) + Chill Time: 2 hours (for the fudge to set)
Nutrition
- Serving Size: 1-2 pieces per person
- Calories: 210 kcal
- Sugar: 23g
- Fat: 10g
- Carbohydrates: 28g
- Fiber: 1g
- Protein: 3g
