Ingredients
For the Brownie Bites:
- 1 cup unsalted butter (2 sticks)
- 1 ½ cups granulated sugar
- 4 large eggs
- 1 teaspoon vanilla extract
- ¾ cup unsweetened cocoa powder
- 1 cup all-purpose flour
- ½ teaspoon salt
- ½ teaspoon baking powder
For the Decorations:
- 1 cup green frosting (store-bought or homemade)
- ½ cup mini chocolate chips
- Black chocolate candy melts (for witch hats)
- 24–30 chocolate wafer cookies (for the base of the witch hats)
- 24–30 mini ice cream cones (for shaping the witch hats)
- Edible glitter or small sprinkles (optional, for decorating the hats)
Optional Add-Ins and Variations:
- Flavored frosting: Add a few drops of peppermint or almond extract to the green frosting for a fun twist.
- Colored sugar or sprinkles: Use Halloween-themed sprinkles or colored sugar to decorate the tops of the brownies for an extra festive touch.
- Candy eyeballs: Add candy eyes peeking out of the cauldron for a spooky surprise.
Instructions
Step 1: Prepare the Brownie Bites
1. Preheat the Oven:
Preheat your oven to 350°F (175°C) and grease a mini muffin tin or line it with mini muffin liners. This recipe works best with a mini muffin pan to create perfectly round, bite-sized brownie cauldrons.
2. Melt the Butter:
In a small saucepan, melt the butter over low heat. Once melted, remove it from the heat and transfer it to a large mixing bowl.
3. Mix in Sugar and Eggs:
Add the granulated sugar to the melted butter and stir until smooth. Beat in the eggs one at a time, followed by the vanilla extract.
4. Add Dry Ingredients:
In a separate bowl, whisk together the cocoa powder, flour, salt, and baking powder. Gradually add the dry ingredients to the wet ingredients, mixing until just combined. Be careful not to overmix, as this can result in tougher brownies.
5. Fill the Muffin Tin:
Spoon the brownie batter into the mini muffin tin, filling each cavity about ¾ of the way full. The brownies will puff up slightly as they bake.
6. Bake the Brownie Bites:
Bake the brownie bites in the preheated oven for 15-18 minutes, or until a toothpick inserted into the center comes out mostly clean with just a few moist crumbs attached. Let the brownie bites cool in the pan for 5 minutes, then transfer them to a wire rack to cool completely.
Step 2: Make the Witch Hats
1. Melt the Chocolate:
In a microwave-safe bowl, melt the black candy melts in 30-second intervals, stirring between each interval until smooth. If the candy melts are too thick, you can add a teaspoon of vegetable oil to thin them out.
2. Dip the Cones:
Take the mini ice cream cones and dip each one into the melted black chocolate, coating it fully. Let the excess chocolate drip off before placing the cone onto a sheet of parchment paper to dry.
3. Attach the Base:
Once the cones have dried slightly (but are still sticky), place each cone onto a chocolate wafer cookie, using a little extra melted chocolate to “glue” them together. These will form the witch hats.
4. Decorate the Hats:
While the chocolate is still soft, sprinkle the witch hats with edible glitter or small sprinkles if desired. Allow the hats to set completely before handling.
Step 3: Decorate the Brownie Bites
1. Hollow Out the Brownie Centers:
Using the back of a spoon or your fingers, gently press down the center of each brownie bite to create an indentation. This will be the “cauldron” where the green potion will go.
2. Fill with Green Frosting:
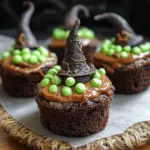
Transfer the green frosting to a piping bag fitted with a small round tip (or use a zip-top bag with the corner snipped off). Pipe a small amount of green frosting into the indentation of each brownie bite to mimic bubbling potion. You can also swirl it to look like potion overflow.
3. Add Mini Chocolate Chips:
Sprinkle mini chocolate chips around the green frosting to represent bubbles or cauldron contents. If you’re feeling extra creative, you can also add candy eyes or tiny Halloween sprinkles for added effect.
Step 4: Assemble the Witchy Cauldrons
1. Place the Witch Hats:
Once the brownie bites are decorated, carefully place one chocolate witch hat on top of each brownie bite. The hats should sit on the frosting as though they are perched on top of the bubbling cauldron.
2. Finishing Touches:
If desired, drizzle a little extra melted chocolate around the base of the witch hats to secure them in place or add more sprinkles and glitter for a magical, witchy look.
Step 5: Chill and Set
Place the decorated brownie bites in the refrigerator for 10-15 minutes to allow the frosting and decorations to set completely. Once they’re firm, they’re ready to be served!
- Prep Time: 30 minutes
- Cook Time: 20-25 minutes
Nutrition
- Serving Size: One brownie bite
- Calories: 210 kcal
- Sugar: 25g
- Fat: 10g
- Carbohydrates: 30g
- Protein: 2g
