
The Brooklyn Blackout Cake is a legendary chocolate dessert born in the heart of Brooklyn, New York. This cake is the epitome of indulgence, with layers of moist, rich chocolate cake, filled and frosted with a velvety chocolate pudding, and finished with a coating of chocolate cake crumbs. The cake gained fame in the mid-20th century thanks to Ebinger’s Bakery, a Brooklyn institution that made this dessert iconic. While the bakery is no longer around, the Brooklyn Blackout Cake remains a cherished recipe, lovingly recreated by home bakers and professional pastry chefs alike. This dessert is a chocolate lover’s dream, perfect for celebrations, dinner parties, or anytime you crave something utterly decadent.
Why You’ll Love This Recipe
The Brooklyn Blackout Cake isn’t just a chocolate cake—it’s an experience. Every bite is a harmonious combination of textures: the tender crumb of the cake, the creamy chocolate pudding filling, and the light crunch of cake crumbs on the exterior. This cake is a showstopper, perfect for making a statement at any gathering. It’s surprisingly simple to make, with ingredients you likely already have in your pantry. Plus, the chocolate pudding layer sets this cake apart, giving it a luscious, creamy filling that makes it stand out from your typical chocolate layer cake. If you’re looking for a dessert that’s both nostalgic and indulgent, this cake will quickly become a favorite.
Preparation Time and Servings
- Prep time: 40 minutes
- Cook time: 1 hour 15 minutes
- Chilling time: 2 hours
- Total time: 3 hours 55 minutes
- Yield: 12 servings
- Serving size: 1 slice
Nutritional Information (per serving)
- Calories: 480
- Carbohydrates: 65g
- Protein: 6g
- Fat: 22g
- Fiber: 4g
- Sugar: 45g
Ingredients
For the Cake
- 2 cups all-purpose flour
- 1 ½ cups granulated sugar
- ¾ cup unsweetened cocoa powder
- 2 teaspoons baking powder
- 1 teaspoon baking soda
- ½ teaspoon salt
- 3 large eggs, at room temperature
- 1 cup buttermilk, at room temperature
- ½ cup vegetable oil
- 2 teaspoons pure vanilla extract
- 1 cup hot coffee (or hot water)
For the Chocolate Pudding Filling
- 3 cups whole milk
- ¾ cup granulated sugar
- ¼ cup cornstarch
- ¼ cup unsweetened cocoa powder
- ¼ teaspoon salt
- 3 large egg yolks
- 4 ounces semisweet chocolate, finely chopped
- 2 teaspoons pure vanilla extract
- 2 tablespoons unsalted butter
For Assembly and Decoration
- 1 cup cake crumbs (from one of the baked layers, crumbled finely)
- Optional: Chocolate shavings or curls for garnish
Step-by-Step Instructions
1. Make the Cake
- Prepare the Pans: Preheat your oven to 350°F (175°C). Grease and line three 8-inch round cake pans with parchment paper.
- Mix the Dry Ingredients: In a large bowl, sift together the flour, sugar, cocoa powder, baking powder, baking soda, and salt. Whisk to combine.
- Combine Wet Ingredients: In a separate bowl, whisk together the eggs, buttermilk, vegetable oil, and vanilla extract. Slowly add the wet ingredients to the dry ingredients and mix until just combined.
- Add the Coffee: Gradually stir in the hot coffee (or hot water). The batter will be thin, but this ensures a moist cake.
- Bake the Layers: Divide the batter evenly among the prepared cake pans. Bake for 25-30 minutes, or until a toothpick inserted into the center comes out clean.
- Cool the Cakes: Allow the cakes to cool in the pans for 10 minutes, then transfer them to a wire rack to cool completely.
2. Make the Chocolate Pudding Filling
- Combine Dry Ingredients: In a medium saucepan, whisk together the sugar, cornstarch, cocoa powder, and salt. Gradually whisk in the milk until smooth.
- Cook the Pudding: Place the saucepan over medium heat and cook, whisking constantly, until the mixture thickens and starts to bubble, about 5-7 minutes.
- Temper the Eggs: In a small bowl, whisk the egg yolks. Gradually add a small amount of the hot pudding mixture to the yolks, whisking constantly to prevent curdling. Then, return the yolk mixture to the saucepan and continue cooking for 1-2 minutes.
- Add Chocolate and Butter: Remove the pudding from the heat and stir in the chopped chocolate, vanilla extract, and butter until smooth.
- Chill the Pudding: Transfer the pudding to a bowl, cover with plastic wrap pressed directly against the surface to prevent a skin from forming, and refrigerate until completely cool, about 2 hours.
3. Assemble the Cake
- Level the Layers: If needed, level the tops of the cake layers using a serrated knife. Crumble one layer into fine crumbs and set aside for decorating.
- Layer the Cake: Place one cake layer on a serving plate or cake stand. Spread a generous layer of the chocolate pudding filling over the top. Add the second cake layer and spread more pudding on top.
- Frost the Cake: Spread the remaining pudding over the top and sides of the cake, smoothing it evenly.
- Add the Crumbs: Press the reserved cake crumbs onto the sides and top of the cake, covering it completely.
4. Chill and Serve
Refrigerate the assembled cake for at least 1 hour before serving to allow the layers to set. Slice and enjoy!
Ingredient Background
The Cake
The chocolate cake layers are made with classic ingredients like cocoa powder, buttermilk, and hot coffee. Buttermilk adds a subtle tang and ensures a tender crumb, while the coffee enhances the chocolate flavor without making the cake taste like coffee.
The Pudding
The chocolate pudding filling is the star of the Brooklyn Blackout Cake. It’s rich, creamy, and velvety, made with a combination of cocoa powder and semisweet chocolate. The cornstarch thickens the pudding, while the egg yolks add richness and a silky texture.
The Crumbs
The cake crumbs on the exterior are a signature feature of the Brooklyn Blackout Cake, giving it a unique texture and rustic appearance. They not only look beautiful but also provide an extra layer of chocolate flavor in every bite.
Technique Tips
- Use Room Temperature Ingredients: Room temperature eggs and buttermilk ensure a smooth batter and even baking.
- Don’t Overmix the Batter: Overmixing can lead to a dense cake. Stir until just combined for a tender crumb.
- Chill the Pudding: Make sure the pudding is completely chilled before assembling the cake to prevent it from sliding between layers.
- Crumb Coating: For a clean finish, you can apply a thin layer of pudding as a crumb coat, chill it, and then add the final layer of pudding and crumbs.
Alternative Presentation Ideas
- Mini Cakes: Bake the cake batter in cupcake tins, layer the pudding, and top with crumbs for individual servings.
- Trifle Style: Layer pieces of cake, pudding, and crumbs in a trifle dish for a deconstructed version.
- Sheet Cake: Make the cake in a 9×13-inch pan, layer the pudding on top, and sprinkle with crumbs for a simplified presentation.
Additional Tips for Success
- Make Ahead: You can bake the cake layers and make the pudding a day ahead. Assemble the cake on the day you plan to serve it.
- Storing the Cake: Store the cake in the refrigerator, covered, for up to 3 days.
- Use High-Quality Cocoa: For the best flavor, use a good-quality unsweetened cocoa powder and semisweet chocolate.
- Sift the Cocoa Powder: Sifting the cocoa powder prevents lumps in the batter and pudding.
Recipe Variations
- White Chocolate Twist: Swap the chocolate pudding for white chocolate pudding for a unique twist.
- Peanut Butter Pudding: Add a swirl of peanut butter to the pudding for a chocolate-peanut butter combination.
- Gluten-Free: Use a gluten-free flour blend for the cake to make it gluten-free.
- Mocha Blackout Cake: Add espresso powder to the cake batter and pudding for a mocha flavor.
Freezing and Storage
- Refrigeration: Store the assembled cake in an airtight container in the refrigerator for up to 3 days.
- Freezing: You can freeze the unassembled cake layers for up to 3 months. Wrap them tightly in plastic wrap and foil. Thaw before assembling.
- Leftovers: Leftover slices can be individually wrapped and frozen for up to 1 month. Thaw overnight in the refrigerator before serving.
Healthier Twist Ideas
- Use Greek yogurt in place of some of the oil in the cake batter for reduced fat.
- Substitute coconut sugar or a sugar alternative for the granulated sugar.
- Use dark chocolate with a higher cacao content for the pudding to reduce sugar.
- Replace whole milk with almond milk or oat milk for a lighter pudding.
Serving Suggestions for Events
- Birthday Parties: Decorate the top of the cake with candles or sprinkles for a celebratory touch.
- Dinner Parties: Serve with a scoop of vanilla ice cream or a dollop of whipped cream for an extra indulgent dessert.
- Holiday Gatherings: Add festive garnishes like powdered sugar, edible glitter, or holiday-themed toppers.
Special Equipment
- 8-inch cake pans: For evenly baked layers.
- Offset spatula: To spread the pudding and create a smooth finish.
- Serrated knife: For leveling the cake layers and slicing.
Frequently Asked Questions
Q: Can I use store-bought pudding?
A: While homemade pudding provides the best flavor and texture, you can use store-bought pudding for convenience.
Q: What if I don’t have buttermilk?
A: You can make a substitute by mixing 1 cup of milk with 1 tablespoon of vinegar or lemon juice. Let it sit for 5 minutes before using.
Q: Can I use a different size cake pan?
A: Yes, you can use 9-inch pans, but the layers will be thinner, and the baking time may vary slightly.
Q: How can I prevent the cake layers from sticking to the pan?
A: Grease the pans well and line them with parchment paper for easy removal.
Q: Can I make this cake dairy-free?
A: Use dairy-free milk, butter, and chocolate in both the cake and pudding for a dairy-free version.
Q: How do I prevent the pudding from forming a skin?
A: Press plastic wrap directly onto the surface of the pudding while it cools.
Q: What can I do if my pudding is too runny?
A: Cook it a little longer over medium heat, whisking constantly, until it thickens.
Q: How long does the assembled cake need to chill?
A: Chill the assembled cake for at least 1 hour to allow the layers to set before slicing.
Conclusion
The Brooklyn Blackout Cake is a timeless classic that continues to captivate chocolate lovers everywhere. Its rich layers of chocolate cake, creamy pudding filling, and crunchy crumb topping make it a dessert worth every minute of effort. Whether you’re baking it for a special occasion or simply to satisfy a chocolate craving, this cake is guaranteed to impress. Give it a try and bring a little bit of Brooklyn’s sweet history into your home!
Print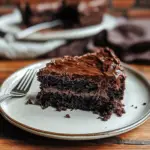
Brooklyn Blackout Cake
- Total Time: 3 hours 55 minutes
- Yield: 12 servings 1x
Ingredients
For the Cake
- 2 cups all-purpose flour
- 1 ½ cups granulated sugar
- ¾ cup unsweetened cocoa powder
- 2 teaspoons baking powder
- 1 teaspoon baking soda
- ½ teaspoon salt
- 3 large eggs, at room temperature
- 1 cup buttermilk, at room temperature
- ½ cup vegetable oil
- 2 teaspoons pure vanilla extract
- 1 cup hot coffee (or hot water)
For the Chocolate Pudding Filling
- 3 cups whole milk
- ¾ cup granulated sugar
- ¼ cup cornstarch
- ¼ cup unsweetened cocoa powder
- ¼ teaspoon salt
- 3 large egg yolks
- 4 ounces semisweet chocolate, finely chopped
- 2 teaspoons pure vanilla extract
- 2 tablespoons unsalted butter
For Assembly and Decoration
- 1 cup cake crumbs (from one of the baked layers, crumbled finely)
- Optional: Chocolate shavings or curls for garnish
Instructions
1. Make the Cake
- Prepare the Pans: Preheat your oven to 350°F (175°C). Grease and line three 8-inch round cake pans with parchment paper.
- Mix the Dry Ingredients: In a large bowl, sift together the flour, sugar, cocoa powder, baking powder, baking soda, and salt. Whisk to combine.
- Combine Wet Ingredients: In a separate bowl, whisk together the eggs, buttermilk, vegetable oil, and vanilla extract. Slowly add the wet ingredients to the dry ingredients and mix until just combined.
- Add the Coffee: Gradually stir in the hot coffee (or hot water). The batter will be thin, but this ensures a moist cake.
- Bake the Layers: Divide the batter evenly among the prepared cake pans. Bake for 25-30 minutes, or until a toothpick inserted into the center comes out clean.
- Cool the Cakes: Allow the cakes to cool in the pans for 10 minutes, then transfer them to a wire rack to cool completely.
2. Make the Chocolate Pudding Filling
- Combine Dry Ingredients: In a medium saucepan, whisk together the sugar, cornstarch, cocoa powder, and salt. Gradually whisk in the milk until smooth.
- Cook the Pudding: Place the saucepan over medium heat and cook, whisking constantly, until the mixture thickens and starts to bubble, about 5-7 minutes.
- Temper the Eggs: In a small bowl, whisk the egg yolks. Gradually add a small amount of the hot pudding mixture to the yolks, whisking constantly to prevent curdling. Then, return the yolk mixture to the saucepan and continue cooking for 1-2 minutes.
- Add Chocolate and Butter: Remove the pudding from the heat and stir in the chopped chocolate, vanilla extract, and butter until smooth.
- Chill the Pudding: Transfer the pudding to a bowl, cover with plastic wrap pressed directly against the surface to prevent a skin from forming, and refrigerate until completely cool, about 2 hours.
3. Assemble the Cake
- Level the Layers: If needed, level the tops of the cake layers using a serrated knife. Crumble one layer into fine crumbs and set aside for decorating.
- Layer the Cake: Place one cake layer on a serving plate or cake stand. Spread a generous layer of the chocolate pudding filling over the top. Add the second cake layer and spread more pudding on top.
- Frost the Cake: Spread the remaining pudding over the top and sides of the cake, smoothing it evenly.
- Add the Crumbs: Press the reserved cake crumbs onto the sides and top of the cake, covering it completely.
4. Chill and Serve
Refrigerate the assembled cake for at least 1 hour before serving to allow the layers to set. Slice and enjoy!
- Prep Time: 40 minutes
- Chill time: 2 hours
- Cook Time: 1 hour 15 minutes
Nutrition
- Serving Size: 1 slice
- Calories: 480
- Sugar: 45g
- Fat: 22g
- Carbohydrates: 65g
- Fiber: 4g
- Protein: 6g