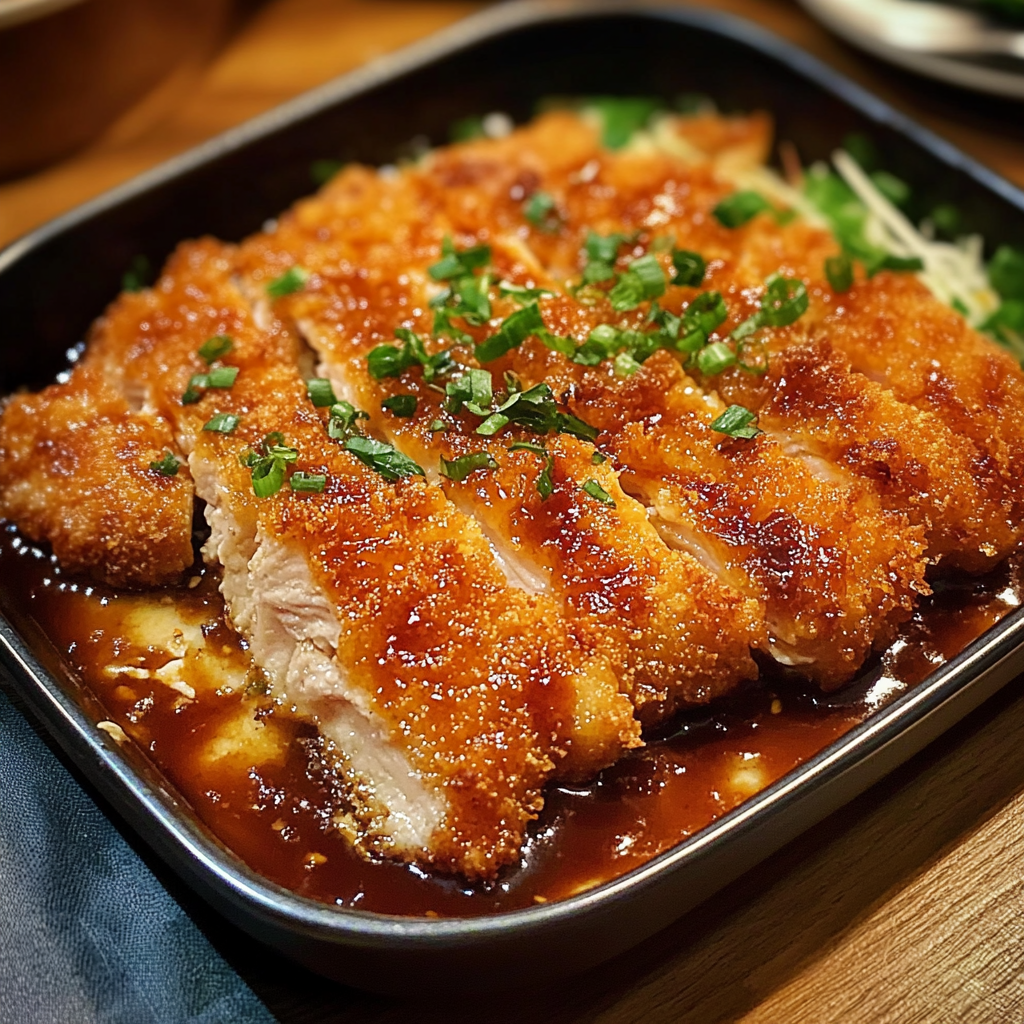
Golden, crispy, and utterly satisfying—Chicken Katsu is the ultimate comfort food that blends Japanese tradition with an irresistible crunch. This dish features a perfectly breaded and fried chicken cutlet that boasts a tender, juicy interior wrapped in a crisp, golden-brown crust. Traditionally served with a rich, tangy Tonkatsu sauce and a side of steamed rice or shredded cabbage, Chicken Katsu is an absolute crowd-pleaser.
If you’ve ever visited a Japanese restaurant, you’ve probably seen this dish on the menu. The beauty of Chicken Katsu lies in its simplicity: a few high-quality ingredients come together to create a dish that is both hearty and flavorful. The balance of textures—crunchy on the outside and tender on the inside—makes it an experience to savor with every bite.
Why You’ll Love This Chicken Katsu
Few dishes achieve the perfect harmony of crunch and tenderness quite like Chicken Katsu. From its golden panko coating to the mouthwatering juiciness of the chicken, this dish delivers a texture and flavor explosion with every bite. The crispiness of the fried breading locks in the juices of the meat, ensuring each bite is as satisfying as the last. Whether you dip it in traditional Tonkatsu sauce, serve it with a bed of rice, or enjoy it alongside a fresh salad, Chicken Katsu is versatile and incredibly delicious.
Another reason to love this dish is its universal appeal. While it originates from Japan, Chicken Katsu has gained worldwide recognition, making its way into bento boxes, sandwich fillings, and even fusion-style wraps. The beauty of this dish is that it caters to different tastes—you can keep it traditional with Japanese sides or experiment with different accompaniments. Plus, kids love it! The crispy, mild-flavored breading makes it an easy favorite for even the pickiest eaters.
Preparation Time and Yield
- Prep Time: 15 minutes
- Cook Time: 10 minutes
- Total Time: 25 minutes
- Servings: 4
Nutritional Information (Per Serving)
- Calories: 450
- Carbohydrates: 42g
- Protein: 35g
- Fat: 15g
- Fiber: 2g
- Sugar: 3g
Ingredients for Chicken Katsu
- 2 large boneless, skinless chicken breasts
- 1 cup all-purpose flour
- 2 large eggs
- 2 tablespoons milk
- 2 cups panko breadcrumbs
- 1 teaspoon salt
- ½ teaspoon black pepper
- ½ teaspoon garlic powder (optional)
- ½ teaspoon paprika (optional, for added color and flavor)
- 1 cup vegetable oil (for frying)
- 1 tablespoon soy sauce (optional, for added umami in the egg wash)
For Serving:
- Steamed white rice
- Shredded cabbage
- Tonkatsu sauce (or homemade substitute with ketchup, Worcestershire sauce, and soy sauce)
Step-by-Step Instructions
 for Chicken Katsu
Step 1: Prepare the Chicken
Begin by prepping the chicken breasts. Lay them flat on a cutting board and, using a sharp knife, carefully slice each breast in half horizontally to create thinner cutlets. This ensures even cooking and helps achieve that perfect crispy texture. If necessary, use a meat mallet or rolling pin to gently pound the chicken to an even thickness—about ½ inch thick.
Step 2: Season and Set Up Breading Station
Season the chicken cutlets with salt, black pepper, and, if desired, a touch of garlic powder and paprika. Next, prepare the breading station:
- Place the flour in a shallow dish.
- In a separate bowl, whisk the eggs with milk and a splash of soy sauce for extra flavor.
- In a third dish, spread out the panko breadcrumbs.
Step 3: Coat the Chicken
Take one chicken cutlet and dredge it in the flour, ensuring it’s evenly coated. Shake off any excess flour. Next, dip the chicken into the egg mixture, allowing the excess to drip off before pressing it firmly into the panko breadcrumbs. Make sure the entire cutlet is coated with a thick, even layer of breadcrumbs—this is the key to achieving the signature crispy exterior. Repeat with the remaining chicken pieces.
Step 4: Heat the Oil
In a large frying pan or skillet, heat about 1 cup of vegetable oil over medium heat. To test if the oil is ready, drop a few panko crumbs into the pan—if they sizzle and turn golden within a few seconds, the oil is at the perfect frying temperature (about 350°F or 175°C).
Step 5: Fry the Chicken
Carefully place the breaded chicken cutlets into the hot oil, frying for about 3-4 minutes on each side until golden brown and crispy. Avoid overcrowding the pan, as this can lower the oil temperature and make the breading soggy. Work in batches if needed. Once done, transfer the cooked chicken to a wire rack or a plate lined with paper towels to drain excess oil.
Step 6: Slice and Serve
Allow the Chicken Katsu to rest for a minute before slicing it into strips. Serve it hot with a side of steamed rice, shredded cabbage, and a generous drizzle of Tonkatsu sauce. Enjoy!
Ingredient Background
Every bite of Chicken Katsu delivers a beautiful combination of flavors and textures, thanks to the carefully chosen ingredients. Let’s take a deeper look at some key elements that make this dish so special.
The star of the show is chicken breast, a lean and protein-packed cut that remains juicy and tender when prepared correctly. While some variations use chicken thighs for a richer flavor, chicken breast is ideal for achieving a light, crispy bite that perfectly absorbs the sauce. The key to a perfect katsu lies in its preparation—slicing and pounding the meat ensures even cooking and prevents dryness.
Another crucial component is panko breadcrumbs, the Japanese-style breadcrumbs that give Chicken Katsu its signature crunch. Unlike regular breadcrumbs, panko is made from crustless bread and has a coarser texture, allowing for a crispier and airier coating. This makes a huge difference when frying, as the cutlet remains light rather than dense and heavy. Panko also absorbs less oil, resulting in a golden, crispy exterior without feeling greasy.
No Chicken Katsu is complete without Tonkatsu sauce, a thick, savory-sweet sauce that enhances the dish with its bold umami flavor. This sauce typically combines Worcestershire sauce, ketchup, soy sauce, and a hint of sugar, offering a complex balance of tanginess, sweetness, and depth. While store-bought versions are available, a homemade blend can add a personal touch to your dish.
Technique Tips for Chicken Katsu
Achieving the perfect Chicken Katsu requires a few key techniques that can make all the difference between a good dish and an exceptional one. The first tip is to ensure the chicken is evenly flattened before cooking. Uneven thickness can lead to overcooked edges and undercooked centers, so using a meat mallet to pound the chicken to a uniform ½-inch thickness helps it cook evenly and retain its juiciness.
Another essential step is double-coating for an ultra-crispy texture. While one coating of flour, egg, and panko is sufficient, pressing the chicken firmly into the breadcrumbs and repeating the egg-and-panko step creates a thicker, crunchier layer. This technique is often used in restaurants to achieve that signature crunch that stays crisp even after being drizzled with sauce.
The frying method also plays a huge role. Shallow frying instead of deep frying ensures the chicken doesn’t absorb too much oil while still developing a crisp golden crust. The key is maintaining the oil at the right temperature—about 350°F (175°C). If the oil is too hot, the breading will burn before the chicken is cooked through; too cold, and the coating will absorb excess oil and turn soggy. Using a thermometer or testing with a small panko crumb ensures the oil is just right.
Alternative Presentation Ideas
Chicken Katsu is traditionally served with rice and cabbage, but there are countless creative ways to present this dish. One popular variation is the Chicken Katsu Sandwich, where crispy katsu is placed between slices of fluffy milk bread (shokupan) with shredded cabbage and a drizzle of Tonkatsu sauce. This makes for an incredible lunch option, balancing crunch, softness, and rich flavors in every bite.
For a more fusion-style twist, try Chicken Katsu Tacos. Instead of traditional tortillas, use lightly toasted flour tortillas or steamed bao buns, then fill them with thinly sliced katsu, shredded cabbage, and a spicy mayo or sriracha drizzle. This unique take introduces a playful balance of Japanese and street food flavors, making it perfect for parties or casual gatherings.
Another stunning way to serve Chicken Katsu is as a rice bowl (Katsudon). In this variation, the crispy chicken is simmered in a savory-sweet sauce with onions and eggs, then poured over a steaming bowl of rice. The result? A comforting, umami-rich dish that combines the crunch of katsu with the softness of the rice and egg.
Freezing and Storing Chicken Katsu
Chicken Katsu is an excellent make-ahead meal that stores well when handled properly. If you have leftovers, the best way to store them is refrigerating in an airtight container. To maintain crispiness, place a paper towel in the container to absorb excess moisture. Properly stored, Chicken Katsu will stay fresh for up to 3 days in the refrigerator.
For longer storage, freezing is the best option. To freeze, allow the cooked cutlets to cool completely, then place them in a single layer on a baking sheet and freeze for 1-2 hours. Once frozen solid, transfer them to a freezer-safe bag or container. This prevents them from sticking together and makes reheating easier. Frozen Chicken Katsu can last up to 3 months.
Reheating is key to keeping the katsu crispy. Instead of microwaving (which makes the breading soggy), use an oven or air fryer. Bake at 375°F (190°C) for about 10-12 minutes or air fry at 350°F (175°C) for 5-7 minutes. This method restores the crispiness while keeping the inside juicy.
Healthier Twist Ideas
If you want a healthier version of Chicken Katsu, baking or air frying is a great alternative to traditional frying. Baked Chicken Katsu can be made by placing the breaded chicken on a greased baking sheet and baking at 400°F (200°C) for 20 minutes, flipping halfway. Brushing the cutlets lightly with oil before baking helps achieve a crispy texture without deep frying.
Another option is air frying, which provides the same crunch with significantly less oil. Simply spray the breaded cutlets with cooking spray and air fry at 375°F (190°C) for about 12-15 minutes, flipping once. This method cuts down on excess fats while maintaining the dish’s signature crunch.
For a low-carb version, swap panko breadcrumbs for almond flour or crushed pork rinds. These alternatives still provide a crispy texture but reduce carbohydrate intake, making this dish keto-friendly. Pairing it with a fresh salad instead of rice also lightens the meal while keeping it filling.
Serving Suggestions for Events
Chicken Katsu is a fantastic dish for any occasion. For family dinners, serving it with miso soup, rice, and a side of pickled vegetables creates a well-rounded, comforting meal. It’s easy to prepare in large batches, making it a stress-free option for feeding a crowd.
If you’re hosting a casual party or game night, Chicken Katsu sliders are a fun way to serve this dish. Mini katsu cutlets can be placed in slider buns with shredded lettuce and Tonkatsu sauce, making them perfect for sharing.
For special celebrations, a Chicken Katsu platter works beautifully. Arrange sliced katsu with dipping sauces like Tonkatsu, spicy mayo, and honey mustard, then serve with rice, pickles, and fresh veggies. This interactive setup allows guests to customize their plates while enjoying different flavors.
Frequently Asked Questions (FAQs)
1. Can I use chicken thighs instead of chicken breasts?
Yes! Chicken thighs provide a juicier and more flavorful cut, but they may require slightly longer cooking time.
2. What’s the best oil for frying Chicken Katsu?
Neutral oils like vegetable, canola, or peanut oil work best, as they have a high smoke point and won’t overpower the flavor.
3. Can I make Chicken Katsu gluten-free?
Absolutely! Use gluten-free flour and swap panko for crushed gluten-free crackers or breadcrumbs.
4. How do I keep the coating from falling off?
Make sure to press the breadcrumbs firmly onto the chicken, and let the breaded cutlets rest for 10 minutes before frying.
5. What’s a good substitute for Tonkatsu sauce?
Mix ketchup, Worcestershire sauce, soy sauce, and a pinch of sugar for a quick homemade alternative.
Conclusion
Chicken Katsu is the perfect combination of crispy, juicy, and flavorful, making it a must-try dish for any occasion. Whether you’re making it for a simple weeknight dinner or an impressive party meal, this recipe delivers restaurant-quality results with minimal effort. Try it today and experience the deliciousness of homemade Japanese comfort food!
Print
Chicken Katsu
- Total Time: 25 minutes
- Yield: 4 servings 1x
Ingredients
Ingredients for Chicken Katsu
- 2 large boneless, skinless chicken breasts
- 1 cup all-purpose flour
- 2 large eggs
- 2 tablespoons milk
- 2 cups panko breadcrumbs
- 1 teaspoon salt
- ½ teaspoon black pepper
- ½ teaspoon garlic powder (optional)
- ½ teaspoon paprika (optional, for added color and flavor)
- 1 cup vegetable oil (for frying)
- 1 tablespoon soy sauce (optional, for added umami in the egg wash)
For Serving:
- Steamed white rice
- Shredded cabbage
- Tonkatsu sauce (or homemade substitute with ketchup, Worcestershire sauce, and soy sauce)
Instructions
Step 1: Prepare the Chicken
Begin by prepping the chicken breasts. Lay them flat on a cutting board and, using a sharp knife, carefully slice each breast in half horizontally to create thinner cutlets. This ensures even cooking and helps achieve that perfect crispy texture. If necessary, use a meat mallet or rolling pin to gently pound the chicken to an even thickness—about ½ inch thick.
Step 2: Season and Set Up Breading Station
Season the chicken cutlets with salt, black pepper, and, if desired, a touch of garlic powder and paprika. Next, prepare the breading station:
- Place the flour in a shallow dish.
- In a separate bowl, whisk the eggs with milk and a splash of soy sauce for extra flavor.
- In a third dish, spread out the panko breadcrumbs.
Step 3: Coat the Chicken
Take one chicken cutlet and dredge it in the flour, ensuring it’s evenly coated. Shake off any excess flour. Next, dip the chicken into the egg mixture, allowing the excess to drip off before pressing it firmly into the panko breadcrumbs. Make sure the entire cutlet is coated with a thick, even layer of breadcrumbs—this is the key to achieving the signature crispy exterior. Repeat with the remaining chicken pieces.
Step 4: Heat the Oil
In a large frying pan or skillet, heat about 1 cup of vegetable oil over medium heat. To test if the oil is ready, drop a few panko crumbs into the pan—if they sizzle and turn golden within a few seconds, the oil is at the perfect frying temperature (about 350°F or 175°C).
Step 5: Fry the Chicken
Carefully place the breaded chicken cutlets into the hot oil, frying for about 3-4 minutes on each side until golden brown and crispy. Avoid overcrowding the pan, as this can lower the oil temperature and make the breading soggy. Work in batches if needed. Once done, transfer the cooked chicken to a wire rack or a plate lined with paper towels to drain excess oil.
Step 6: Slice and Serve
Allow the Chicken Katsu to rest for a minute before slicing it into strips. Serve it hot with a side of steamed rice, shredded cabbage, and a generous drizzle of Tonkatsu sauce. Enjoy!
- Prep Time: 15 minutes
- Cook Time: 10 minutes
Nutrition
- Calories: 450
- Sugar: 3g
- Fat: 15g
- Carbohydrates: 42g
- Fiber: 2g
- Protein: 35