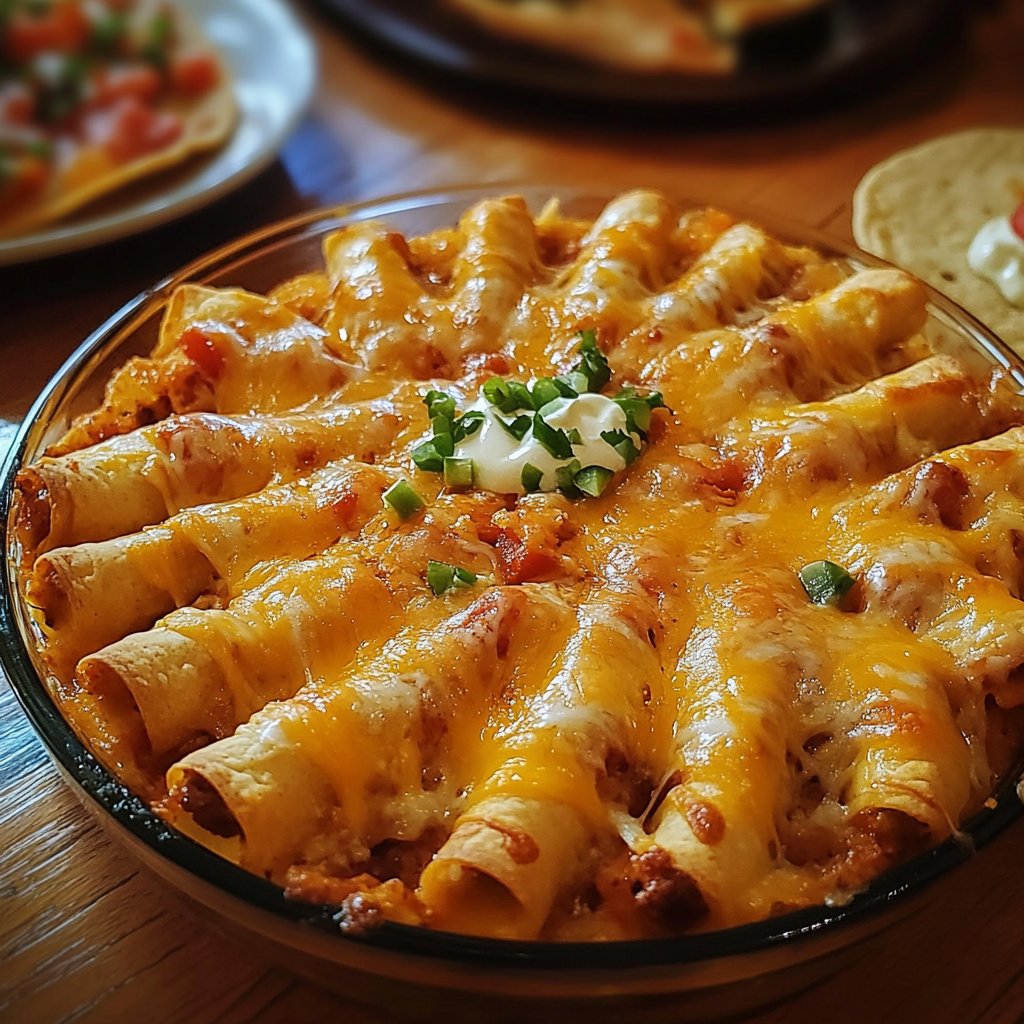
Looking for a fun, crowd-pleasing recipe that’s equal parts snack, meal, and cheesy indulgence? Cheesy Taco Sticks are here to satisfy your cravings. Imagine soft, buttery breadsticks stuffed with seasoned taco meat, gooey melted cheese, and topped with just the right amount of flavor-packed seasoning. These handheld treats are perfect for game days, parties, family dinners, or even as an after-school snack. They’re easy to make, endlessly customizable, and most importantly, incredibly delicious.
What makes cheesy taco sticks so special is the combination of textures and flavors. The savory taco meat pairs beautifully with the melted cheese, all encased in golden, fluffy dough. Each bite is like a mini taco party in your mouth. The best part? They’re made with simple ingredients and can be prepped in advance. Whether you’re serving them as an appetizer or making them the star of the show, these cheesy taco sticks are guaranteed to disappear quickly. Let’s get started!
Why You’ll Love This Recipe
- Easy to Make: Using premade dough shortcuts the process, but you can also make your own dough if you prefer.
- Versatile: These taco sticks are easy to customize with different fillings, cheeses, and toppings.
- Kid-Friendly: The cheesy, savory flavors make them a hit with kids and adults alike.
- Perfect for Any Occasion: Whether it’s a party appetizer, a weeknight dinner, or a snack for game day, these taco sticks fit any occasion.
- Meal Prep-Friendly: Make a big batch, freeze extras, and reheat them for quick, satisfying meals or snacks.
Preparation Time and Servings
- Prep Time: 15 minutes
- Cook Time: 20 minutes
- Total Time: 35 minutes
- Yield: 10 taco sticks
- Serving Size: 1 taco stick
Nutritional Information (per serving)
- Calories: 250
- Carbohydrates: 23g
- Protein: 12g
- Fat: 12g
- Fiber: 2g
- Sugar: 1g
Ingredients
For the Taco Filling:
- 1 pound ground beef (or ground turkey for a leaner option)
- 2 teaspoons taco seasoning (store-bought or homemade – recipe below)
- 1/4 teaspoon garlic powder
- 1/4 teaspoon onion powder
- 1/4 teaspoon smoked paprika (optional)
- 1/4 cup tomato sauce or salsa
For the Cheesy Taco Sticks:
- 1 package refrigerated pizza dough (or homemade dough, see notes below)
- 1 1/2 cups shredded cheese (cheddar, Monterey Jack, or a Mexican cheese blend)
- 2 tablespoons butter, melted
- 1/2 teaspoon garlic powder
- 1/2 teaspoon dried parsley
Optional Garnishes:
- Sour cream or Greek yogurt for dipping
- Salsa or pico de gallo
- Guacamole or sliced avocado
- Chopped cilantro
- Jalapeño slices
Homemade Taco Seasoning (Optional):
- 1 tablespoon chili powder
- 1 teaspoon cumin
- 1 teaspoon paprika
- 1/2 teaspoon garlic powder
- 1/2 teaspoon onion powder
- 1/4 teaspoon oregano
- 1/4 teaspoon cayenne pepper (optional, for heat)
- 1/4 teaspoon salt
- 1/4 teaspoon black pepper
Step-by-Step Instructions
1. Prepare the Taco Filling
Heat a large skillet over medium heat. Add the ground beef and cook, breaking it up with a spatula, until browned and fully cooked, about 6-8 minutes. Drain any excess grease.
Reduce the heat to low and stir in the taco seasoning, garlic powder, onion powder, smoked paprika, and tomato sauce (or salsa). Cook for an additional 2-3 minutes, stirring frequently, until the meat is well-coated and the flavors meld together. Remove from heat and set aside to cool slightly.
2. Prepare the Dough
Preheat your oven to 375°F (190°C) and line a baking sheet with parchment paper or a silicone baking mat.
Roll out the refrigerated pizza dough on a clean surface into a large rectangle, about 10×15 inches. If the dough is sticky, sprinkle a little flour on the surface to prevent sticking. Use a sharp knife or pizza cutter to divide the dough into 10 equal strips.
3. Assemble the Taco Sticks
Place a small amount of taco filling (about 2 tablespoons) and a generous sprinkle of shredded cheese onto the center of each dough strip, leaving space at the edges. Carefully fold the dough over the filling and pinch the edges tightly to seal. Roll the stick slightly to smooth out the seams. Repeat with the remaining dough strips.
4. Add the Toppings
Arrange the taco sticks on the prepared baking sheet, seam-side down. Brush the tops with melted butter, then sprinkle with garlic powder and dried parsley for added flavor.
5. Bake the Taco Sticks
Bake in the preheated oven for 18-20 minutes, or until the taco sticks are golden brown and the cheese is bubbling slightly at the edges.
6. Garnish and Serve
Let the taco sticks cool for 5 minutes before serving. Garnish with your favorite toppings, such as chopped cilantro or sliced jalapeños, and serve with dipping sauces like sour cream, salsa, or guacamole.
Ingredient Background
Ground Beef
Ground beef is a classic choice for the filling, but you can substitute it with ground turkey, chicken, or even plant-based meat for a vegetarian option.
Taco Seasoning
The taco seasoning gives these sticks their signature flavor. While store-bought seasoning works perfectly, making your own allows you to control the spice level and sodium content.
Cheese
Cheddar cheese melts beautifully and adds a sharp, tangy flavor, while Monterey Jack is creamy and mild. A Mexican cheese blend is also a great option for a more authentic flavor.
Pizza Dough
Refrigerated pizza dough makes this recipe quick and easy, but you can also use homemade dough for a more traditional, from-scratch approach.
Technique Tips
- Seal the Edges Tightly: Ensure the edges of the dough are sealed to prevent the filling from leaking during baking.
- Cool the Filling: Let the taco meat cool slightly before assembling to prevent the dough from becoming soggy.
- Even Portioning: Use a tablespoon or small scoop to evenly portion the filling for consistent taco sticks.
- Bake Evenly: Space the taco sticks evenly on the baking sheet to ensure they bake uniformly.
Alternative Presentation Ideas
- Mini Taco Bites: Cut the dough into smaller strips and create bite-sized taco sticks for appetizers.
- Taco Stick Casserole: Arrange the filled taco sticks in a baking dish, cover with enchilada sauce and cheese, and bake as a cheesy casserole.
- Breakfast Taco Sticks: Replace the beef with scrambled eggs and breakfast sausage for a morning twist.
Additional Tips for Success
- For a crispier texture, brush the dough with an egg wash instead of butter before baking.
- If you prefer spicier taco sticks, add diced jalapeños or a pinch of cayenne pepper to the taco filling.
- Use a rolling pin to ensure the dough is evenly spread before cutting into strips.
Recipe Variations
- Vegetarian: Replace the ground beef with black beans, refried beans, or crumbled tofu seasoned with taco spices.
- Buffalo Chicken: Substitute the taco filling with shredded Buffalo chicken and ranch dressing.
- Cheeseburger Taco Sticks: Use ground beef, shredded cheddar, and a drizzle of ketchup and mustard for a cheeseburger-inspired twist.
- Pizza Taco Sticks: Swap the taco meat for pepperoni, marinara sauce, and mozzarella cheese.
Freezing and Storage
Freezing
Assemble the taco sticks but do not bake them. Arrange them on a parchment-lined baking sheet and freeze until solid. Transfer the frozen taco sticks to a freezer-safe bag or container and store for up to 3 months. Bake from frozen, adding an extra 5-10 minutes to the cook time.
Storage
Store leftovers in an airtight container in the refrigerator for up to 4 days. Reheat in the oven at 350°F (175°C) until warmed through, or microwave for 1-2 minutes.
Healthier Twist Ideas
- Use whole-wheat or gluten-free pizza dough.
- Swap sour cream for Greek yogurt in the dipping sauce.
- Reduce the cheese or use a reduced-fat version.
- Add vegetables like diced bell peppers, onions, or spinach to the filling for extra nutrients.
Serving Suggestions for Events
- Game Day Platter: Serve alongside chips, salsa, guacamole, and a bowl of nachos for a game-day feast.
- Family Dinner: Pair with a simple side salad or a cup of tomato soup for a cozy dinner.
- Potluck Favorite: Bring a tray of cheesy taco sticks to a potluck – they’ll be gone in no time!
Special Equipment
- Rolling pin (optional)
- Baking sheet
- Parchment paper or silicone baking mat
- Pastry brush
Frequently Asked Questions
- Can I use homemade pizza dough?
Absolutely! Homemade dough adds a fresh, from-scratch touch. Just make sure it’s rolled out thinly and evenly. - Can I make these ahead of time?
Yes! Assemble the taco sticks up to a day in advance and store them in the refrigerator until ready to bake. - Can I use a different type of meat?
Definitely! Ground chicken, turkey, or even shredded rotisserie chicken work well in this recipe. - What’s the best way to reheat leftovers?
Reheat taco sticks in the oven at 350°F (175°C) for 10 minutes to maintain their crispy texture. - Can I freeze these after baking?
Yes, baked taco sticks can be frozen. Reheat them in the oven or air fryer for best results. - Can I make these gluten-free?
Yes! Use gluten-free pizza dough and ensure your taco seasoning and other ingredients are gluten-free. - What dipping sauces pair well with these?
Sour cream, guacamole, ranch dressing, and salsa are all fantastic dipping options. - How do I prevent the cheese from leaking out?
Make sure the dough is sealed tightly around the edges and avoid overfilling the sticks.
Conclusion
Cheesy Taco Sticks are the ultimate comfort food snack that combines the best of tacos and cheesy breadsticks in one irresistible package. Whether you’re whipping them up for a casual dinner, serving them as appetizers, or packing them as a portable snack, they’re always a hit. With their versatility, ease of preparation, and crowd-pleasing flavors, these taco sticks are bound to become a staple in your recipe collection. So grab your favorite taco toppings, roll up some dough, and enjoy the cheesy, taco-flavored goodness!