Ingredients
For the Meringue:
- 4 large egg whites, room temperature
- 1 cup granulated sugar
- 1/4 teaspoon cream of tartar (optional, helps stabilize the meringue)
- 1 teaspoon vanilla extract
- Pinch of salt
Optional Add-Ins and Variations:
- Food coloring: Add a few drops of black or orange food coloring for a spookier look.
- Flavor extracts: Substitute or add different extracts like almond, peppermint, or lemon for flavor variety.
- Decorations: Dust with edible glitter, colored sugar, or cocoa powder for a fun twist.
- Chocolate drizzle: Drizzle melted dark or white chocolate over the bones after baking for an extra decadent touch.
Equipment Needed:
- Stand mixer or electric hand mixer
- Piping bag with a round tip (or a zip-top bag with the corner snipped)
- Baking sheet lined with parchment paper
- Sifter or fine mesh sieve (for sprinkling cocoa powder, if desired)
Instructions
Step 1: Prepare Your Ingredients and Equipment
1. Preheat the Oven:
Preheat your oven to 200°F (90°C). Meringue needs to bake at a low temperature to dry out slowly and achieve that crisp exterior. If your oven runs hot, you can lower it slightly to prevent browning.
2. Prepare the Baking Sheet:
Line two large baking sheets with parchment paper. The parchment will prevent the meringue from sticking to the pan during baking. You can also trace bone shapes lightly onto the parchment as a guide for piping.
3. Separate the Eggs:
Separate the egg whites from the yolks, ensuring no yolk gets into the whites, as any fat can prevent the meringue from whipping properly. Save the yolks for another recipe, like custard or homemade ice cream.
Step 2: Whip the Egg Whites
1. Start Whipping the Egg Whites:
In the bowl of a stand mixer fitted with the whisk attachment (or using an electric hand mixer), beat the egg whites on medium speed until they become frothy, about 1-2 minutes.
2. Add the Cream of Tartar and Salt:
Add 1/4 teaspoon of cream of tartar (if using) and a pinch of salt to the egg whites. The cream of tartar helps stabilize the egg whites, making it easier to achieve stiff peaks. Continue beating on medium-high speed.
3. Gradually Add the Sugar:
Once the egg whites start to form soft peaks, begin adding the 1 cup of sugar, one tablespoon at a time. Adding the sugar gradually allows it to dissolve evenly into the egg whites, ensuring a smooth and glossy meringue.
4. Add Vanilla Extract:
When the egg whites reach stiff peaks, add the vanilla extract and beat for another 30 seconds until fully incorporated. The meringue should be shiny, thick, and hold stiff peaks when you lift the whisk.
Step 3: Pipe the Meringue Bones
1. Transfer the Meringue to a Piping Bag:
Fill a piping bag fitted with a large round tip with the whipped meringue. If you don’t have a piping bag, you can use a zip-top plastic bag and snip off one corner to create a small opening for piping.
2. Pipe the Bone Shapes:
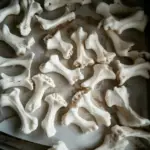
On your prepared baking sheets, pipe the meringue into bone shapes. To do this, pipe two small round mounds close together at the top and bottom of the bone, leaving a narrow line of meringue to connect them in the center (this forms the “bone” structure). The result should look like a long bone with rounded ends.
3. Add Texture (Optional):
For extra spookiness, you can sprinkle a little cocoa powder over the bones to give them a dusty, old-bone look. Sift the cocoa powder lightly over the meringue before baking for the best effect.
Step 4: Bake the Meringue Bones
1. Bake Low and Slow:
Place the baking sheets in the preheated oven and bake the meringue bones at 200°F for 1-2 hours. The baking time depends on the size of your meringue bones. Smaller bones may take only 1 hour, while larger ones may take up to 2 hours. The meringue should feel firm and dry to the touch when done.
2. Check for Doneness:
After 1 hour, check the meringues. They should easily lift off the parchment paper and be crisp all the way through. If the bones are still soft in the center, continue baking for another 15-30 minutes, checking frequently.
3. Cool in the Oven:
Once the meringues are fully dried, turn off the oven and let the meringue bones cool completely inside the oven with the door slightly open. This helps prevent cracks from sudden temperature changes and ensures they dry out thoroughly.
Step 5: Serve and Enjoy!
Your Meringue Bones are now ready to serve! These spooky treats are perfect for a Halloween party or as a fun snack for kids. Arrange them on a platter or pile them up like a “bone yard” for a spooky presentation. You can also package them in small bags tied with black and orange ribbon to give out as Halloween favors.
- Prep Time: 20 minutes
- Cook Time: 1-2 hours (depending on the size of your meringue bones)
Nutrition
- Serving Size: 1 meringue bone
- Calories: 25 kcal
- Sugar: 6g
- Fat: 0g
- Carbohydrates: 6g
- Fiber: 0g
- Protein: 1g
