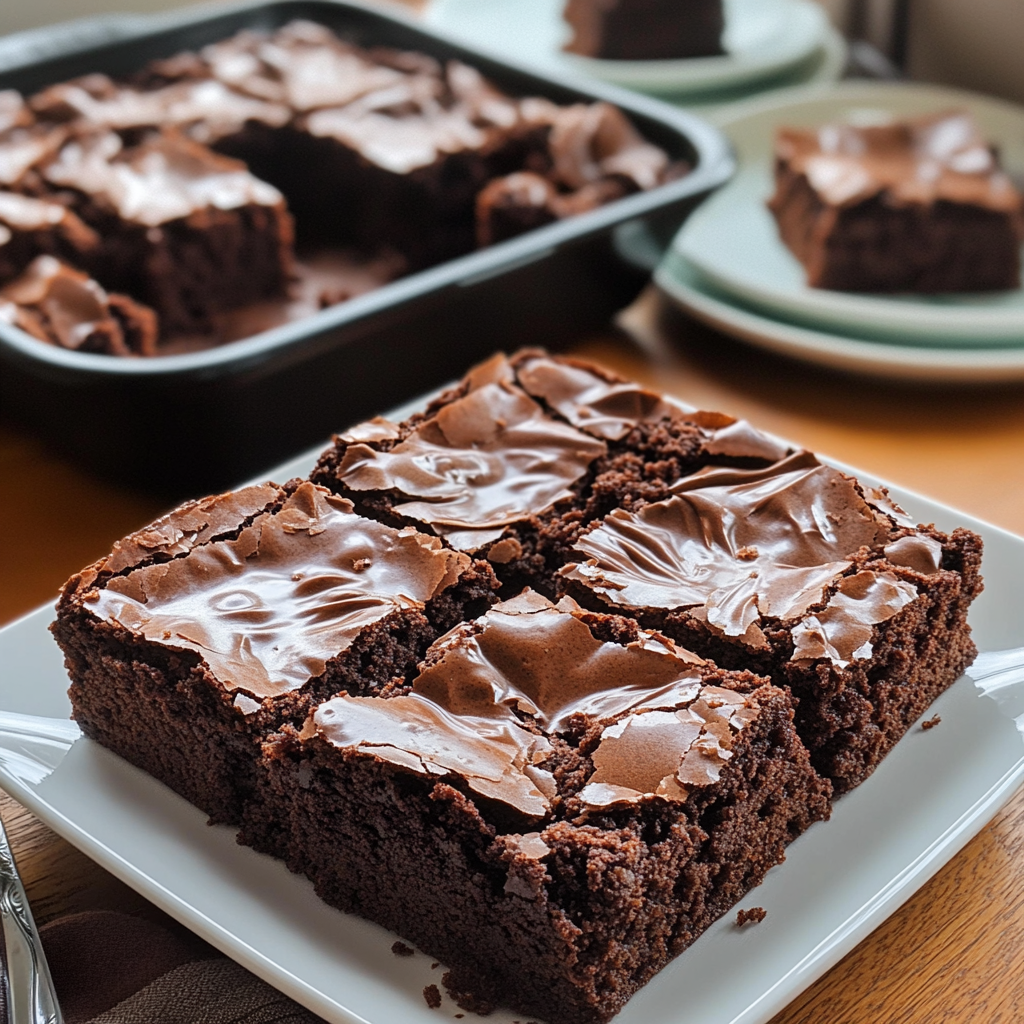
If you’re a chocolate lover, these Triple Chocolate Brownies are the ultimate indulgence! Rich, fudgy, and packed with three types of chocolate, this brownie recipe is guaranteed to satisfy your deepest chocolate cravings. Each bite is loaded with gooey melted chocolate, a crackly top, and a dense, chewy center—everything a perfect brownie should have.
The triple chocolate in this recipe comes from cocoa powder, melted dark chocolate, and chocolate chunks folded into the batter. This combination ensures a deep, intense chocolate flavor, balancing richness and sweetness perfectly. Unlike cakey brownies, this version is super fudgy, with a luscious texture that pairs beautifully with a cold glass of milk or a scoop of vanilla ice cream.
Whether you’re making these brownies for a party, a special occasion, or just to treat yourself, they’re sure to be a hit. Plus, they store well, making them a fantastic make-ahead dessert. Follow this detailed guide for a fail-proof brownie recipe that delivers bakery-quality results every time.
Why You’ll Love This Recipe
- Ultra-Fudgy Texture – Dense, moist, and gooey in the center with a perfect crinkly top.
- Triple Chocolate Goodness – Cocoa powder, melted chocolate, and chocolate chunks in every bite.
- Easy to Make – Simple ingredients and minimal prep time.
- Customizable – Add nuts, caramel, peanut butter, or different chocolate variations.
- Perfect for Any Occasion – Great for parties, potlucks, or a comforting homemade treat.
Preparation Time and Servings
- Prep Time: 15 minutes
- Cook Time: 30 minutes
- Cooling Time: 1 hour
- Total Time: 1 hour 45 minutes
- Yield: 16 brownies
- Serving Size: 1 brownie
Nutritional Information (Per Serving)
- Calories: 280
- Carbohydrates: 35g
- Protein: 4g
- Fat: 15g
- Fiber: 3g
- Sugar: 25g
Ingredients
Dry Ingredients
- ¾ cup unsweetened cocoa powder (high-quality for best flavor)
- 1 cup all-purpose flour
- ½ teaspoon baking powder
- ½ teaspoon salt
Wet Ingredients
- 1 cup butter, melted
- 1 ½ cups granulated sugar
- ½ cup brown sugar
- 3 large eggs, at room temperature
- 2 teaspoons vanilla extract
Chocolate Components
- 6 oz dark chocolate, melted
- ¾ cup semi-sweet chocolate chunks
- ½ cup milk chocolate chips
Optional Add-ins
- ½ cup chopped walnuts or pecans
- ¼ cup caramel swirls
- ¼ teaspoon espresso powder (enhances chocolate flavor)
Step-by-Step Instructions
1. Preheat and Prepare the Baking Pan
- Preheat the oven to 350°F (175°C).
- Line an 8×8-inch baking pan with parchment paper, leaving an overhang for easy removal.
- Grease the parchment lightly with butter or non-stick spray.
2. Melt the Butter and Chocolate
- In a heatproof bowl, melt butter and dark chocolate together using a double boiler or microwave in 30-second intervals (stirring in between).
- Let the mixture cool slightly while preparing the other ingredients.
3. Mix the Wet Ingredients
- In a large bowl, whisk together granulated sugar, brown sugar, and eggs until light and fluffy (about 2 minutes). This step helps create a crackly top.
- Stir in the vanilla extract and melted chocolate mixture, mixing until smooth.
4. Sift the Dry Ingredients
- In a separate bowl, whisk together cocoa powder, flour, baking powder, and salt.
- Gradually fold the dry ingredients into the wet mixture, stirring until just combined. Do not overmix.
5. Fold in the Chocolate Chunks
- Gently stir in the semi-sweet chocolate chunks and milk chocolate chips.
- If adding nuts or caramel swirls, fold them in at this stage.
6. Bake the Brownies
- Pour the batter into the prepared pan and spread evenly.
- Bake for 28–32 minutes or until the center is set but still slightly soft (a toothpick should come out with a few moist crumbs).
- Remove from the oven and let cool in the pan for 15 minutes before transferring to a wire rack.
7. Cool Completely & Slice
- Allow brownies to cool for at least 1 hour before cutting for cleaner slices.
- Slice into 16 squares and serve!
Ingredient Background
- Cocoa Powder: Provides a deep chocolate flavor—use Dutch-processed for a smoother taste.
- Dark Chocolate: Adds richness and a silky texture to the batter.
- Brown Sugar: Increases moisture and adds a caramel-like depth.
- Eggs: Essential for structure and creating a chewy texture.
- Vanilla Extract: Enhances the chocolate flavor beautifully.
Technique Tips
- Whisk the Eggs Well – This helps achieve a crackly top.
- Do Not Overmix – Overmixing the batter results in dense, dry brownies.
- Check for Doneness – A toothpick should come out with moist crumbs, not wet batter.
- Cool Before Slicing – Letting the brownies set prevents them from crumbling.
Alternative Presentation Ideas
- Brownie Sundaes – Serve warm with vanilla ice cream and chocolate sauce.
- Brownie Cheesecake Bars – Layer with a cheesecake mixture before baking.
- Brownie Bites – Bake in a muffin tin for individual portions.
Additional Tips for Success
- Use High-Quality Chocolate – The better the chocolate, the richer the flavor.
- Add a Hint of Coffee – Espresso powder enhances the chocolate taste.
- Store Properly – Keep brownies in an airtight container for freshness.
Recipe Variations
- Peanut Butter Swirl Brownies – Swirl peanut butter into the batter before baking.
- Salted Caramel Brownies – Drizzle caramel and sprinkle sea salt on top.
- Vegan Brownies – Use coconut oil, flax eggs, and dairy-free chocolate.
Freezing and Storage
- Refrigerator: Store in an airtight container for up to 5 days.
- Freezer: Wrap brownies individually in plastic wrap and freeze for up to 3 months.
Healthier Twist Ideas
- Use Coconut Sugar – A lower-glycemic alternative to white sugar.
- Replace Butter with Avocado – Adds healthy fats while keeping brownies moist.
- Whole Wheat Flour – Adds extra fiber without compromising texture.
Serving Suggestions for Events
- Birthday Parties – Serve with colorful sprinkles or whipped cream.
- Holiday Treats – Dust with powdered sugar for a festive look.
- Gift Boxes – Wrap individually in decorative paper for homemade gifts.
Special Equipment
- 8×8 Baking Pan – Ensures thick, fudgy brownies.
- Parchment Paper – Helps with easy removal.
- Offset Spatula – Spreads batter evenly in the pan.
Frequently Asked Questions
1. How do I make my brownies more fudgy?
Use more butter and chocolate, less flour, and no extra leavening agents.
2. Why didn’t my brownies get a crackly top?
Make sure to whisk the eggs and sugar well before adding other ingredients.
3. Can I add mix-ins like nuts or caramel?
Absolutely! Walnuts, pecans, or caramel swirls make great additions.
4. What’s the best way to slice brownies cleanly?
Use a sharp knife and wipe it clean between cuts.
5. Can I double this recipe?
Yes! Use a 9×13-inch pan and increase baking time by 5–10 minutes.
6. Can I use milk chocolate instead of dark chocolate?
Yes, but it will result in a sweeter brownie with a milder chocolate flavor. Dark chocolate (at least 60% cocoa) is recommended for a rich, intense chocolate taste. If you prefer milk chocolate, consider reducing the sugar slightly to balance the sweetness.
7. What’s the difference between Dutch-processed and natural cocoa powder? Can I use either?
- Dutch-processed cocoa is alkalized, giving it a mellow, smooth flavor and darker color.
- Natural cocoa powder is more acidic and has a stronger chocolate flavor.
For this recipe, either type works, but Dutch-processed will create a deeper color and slightly smoother taste. If using natural cocoa, expect a slightly more intense, bittersweet flavor.
8. My brownies came out too dry. What went wrong?
Dry brownies can result from a few common mistakes:
- Overbaking – Brownies should be removed when the center is slightly underbaked. They continue to set as they cool.
- Too much flour – Always measure flour correctly by spooning it into the measuring cup and leveling it off.
- Not enough fat – Butter and chocolate contribute to a fudgy texture. Reducing them will make brownies drier.
9. Can I use oil instead of butter?
Yes, but the texture and flavor will be different.
- Butter adds richness and flavor.
- Oil makes brownies extra moist but less flavorful.
For a compromise, use half butter and half oil for both moisture and flavor. Coconut oil is also a great alternative for a dairy-free option.
10. Why did my brownies sink in the middle?
Sinking brownies are usually due to:
- Overbeating eggs and sugar – Incorporating too much air causes brownies to rise too quickly and then collapse.
- Opening the oven too soon – A sudden temperature change can cause sinking.
- Underbaking – The center may still be raw, causing it to sink as it cools.
To prevent sinking, bake until the edges are set and the center is slightly soft but not wet.
11. How do I get a stronger chocolate flavor?
For a bold, rich chocolate flavor, try these tips:
- Use high-quality chocolate – Brands like Ghirardelli, Lindt, or Valrhona make a difference.
- Add espresso powder – Just ½ teaspoon enhances the chocolate flavor without making the brownies taste like coffee.
- Use both cocoa powder and melted chocolate – This creates depth in the brownies.
12. Can I make these brownies gluten-free?
Yes! Simply replace all-purpose flour with a 1:1 gluten-free flour blend like Bob’s Red Mill or King Arthur’s Measure for Measure Flour. The texture may be slightly different, but the fudginess will still shine.
Conclusion
These Triple Chocolate Brownies are rich, fudgy, and irresistible! Whether you enjoy them plain, with ice cream, or customized with mix-ins, they’re guaranteed to become a favorite dessert. Try them today and enjoy the ultimate chocolate experience!
Print
Triple Chocolate Brownies
- Total Time: 1 hour 45 minutes
- Yield: 16 brownies 1x
Ingredients
Dry Ingredients
- ¾ cup unsweetened cocoa powder (high-quality for best flavor)
- 1 cup all-purpose flour
- ½ teaspoon baking powder
- ½ teaspoon salt
Wet Ingredients
- 1 cup butter, melted
- 1 ½ cups granulated sugar
- ½ cup brown sugar
- 3 large eggs, at room temperature
- 2 teaspoons vanilla extract
Chocolate Components
- 6 oz dark chocolate, melted
- ¾ cup semi-sweet chocolate chunks
- ½ cup milk chocolate chips
Optional Add-ins
- ½ cup chopped walnuts or pecans
- ¼ cup caramel swirls
- ¼ teaspoon espresso powder (enhances chocolate flavor)
Instructions
1. Preheat and Prepare the Baking Pan
- Preheat the oven to 350°F (175°C).
- Line an 8×8-inch baking pan with parchment paper, leaving an overhang for easy removal.
- Grease the parchment lightly with butter or non-stick spray.
2. Melt the Butter and Chocolate
- In a heatproof bowl, melt butter and dark chocolate together using a double boiler or microwave in 30-second intervals (stirring in between).
- Let the mixture cool slightly while preparing the other ingredients.
3. Mix the Wet Ingredients
- In a large bowl, whisk together granulated sugar, brown sugar, and eggs until light and fluffy (about 2 minutes). This step helps create a crackly top.
- Stir in the vanilla extract and melted chocolate mixture, mixing until smooth.
4. Sift the Dry Ingredients
- In a separate bowl, whisk together cocoa powder, flour, baking powder, and salt.
- Gradually fold the dry ingredients into the wet mixture, stirring until just combined. Do not overmix.
5. Fold in the Chocolate Chunks
- Gently stir in the semi-sweet chocolate chunks and milk chocolate chips.
- If adding nuts or caramel swirls, fold them in at this stage.
6. Bake the Brownies
- Pour the batter into the prepared pan and spread evenly.
- Bake for 28–32 minutes or until the center is set but still slightly soft (a toothpick should come out with a few moist crumbs).
- Remove from the oven and let cool in the pan for 15 minutes before transferring to a wire rack.
7. Cool Completely & Slice
- Allow brownies to cool for at least 1 hour before cutting for cleaner slices.
- Slice into 16 squares and serve!
- Prep Time: 15 minutes
- Cooling Time: 1 hour
- Cook Time: 30 minutes
Nutrition
- Serving Size: 1 brownie
- Calories: 280
- Sugar: 25g
- Fat: 15g
- Carbohydrates: 35g
- Fiber: 3g
- Protein: 4g