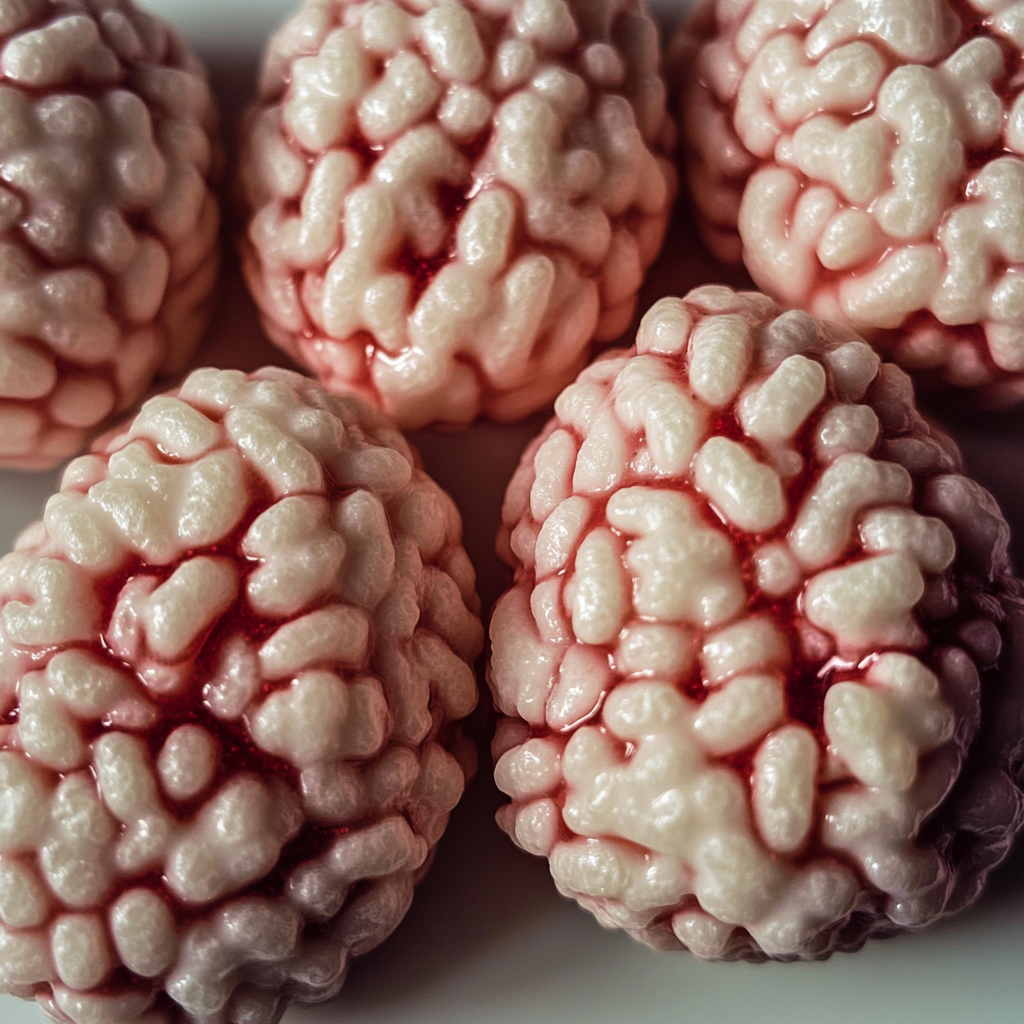
Halloween is the perfect time to unleash your creativity in the kitchen, and nothing says “spooky fun” like a themed dessert. If you’re searching for a Halloween treat that’s both easy to make and creepy-crawly enough to excite (and maybe even gross out) your guests, Marshmallow Rice Bubbles Halloween Brains are the perfect recipe. These gooey, sticky, marshmallow treats are made with puffed rice cereal (often known as Rice Bubbles) and shaped into brain-like mounds for a creepy and festive presentation. They’re both fun to make and delicious to eat—perfect for Halloween parties, school events, or simply as a family activity to celebrate the spooky season.
Not only are these marshmallow brains absolutely adorable in their own creepy way, but they’re also sweet, chewy, and satisfying. The basic recipe is simple: Rice Bubbles cereal mixed with gooey marshmallow and shaped into brains. For an extra spooky effect, you can add red food coloring to the marshmallow mixture or drizzle the finished “brains” with colored icing or melted chocolate to give them an even creepier, blood-like look. These brains are so much fun to eat, you won’t mind them staring back at you!
Whether you’re hosting a Halloween bash or just want to surprise your kids with a fun treat, Marshmallow Rice Bubbles Halloween Brains are sure to be a hit. Let’s dive into this easy recipe that’s both deliciously creepy and irresistibly sweet!
Why You’ll Love These Marshmallow Rice Bubbles Halloween Brains
- Fun and Spooky: These treats look like tiny brains, making them perfect for Halloween parties or themed events.
- Easy to Make: With just a few simple ingredients, you can whip up these marshmallow brains in no time. No baking required!
- Great for Kids: Kids will love helping to shape the brains and decorating them with icing or candy.
- Customizable: You can add food coloring, candy decorations, or drizzle the brains with melted chocolate to make them even creepier.
- Perfect for Parties: These treats are easy to make in large batches, making them ideal for Halloween gatherings, school parties, or trick-or-treating events.
Preparation Time and Servings
- Prep time: 15 minutes
- Cook time: 5 minutes
- Total time: 20-25 minutes
- Yield: Makes 12-15 brains (depending on size)
- Serving Size: 1 brain per person
Nutritional Information (per serving)
- Calories: 180 kcal
- Carbs: 38g
- Protein: 1g
- Fat: 3g
- Sugar: 25g
(These values are approximate and will vary depending on the exact ingredients used and portion sizes.)
Ingredients
Here’s what you’ll need to make Marshmallow Rice Bubbles Halloween Brains:
For the Brains:
- 6 cups Rice Bubbles cereal (or any puffed rice cereal)
- 1/4 cup butter (unsalted)
- 1 bag (10 oz/300g) mini marshmallows
- 1 teaspoon vanilla extract
- A few drops of red or pink food coloring (optional, to give the brains a fleshy tone)
For Decoration:
- Red decorating gel or red icing (for the blood effect)
- Candy eyes (optional, for extra creepy flair)
- White chocolate, melted (optional, for drizzling)
- Green food coloring (optional, to tint the white chocolate or icing)
- Edible glitter or sprinkles (optional, to make the brains extra fun)
Optional Add-Ins:
- Crushed candy or chocolate chips, for texture and added flavor
- Shredded coconut for a different texture (can also be colored with food dye)
- Candy worms or gummy worms, to poke out of the brains for an extra creepy effect
Step-by-Step Instructions
Step 1: Prepare the Work Surface and Ingredients
1. Grease Your Hands or Molds:
Marshmallow treats can get sticky! Lightly grease your hands with butter or non-stick spray before shaping the brains. If you’re using brain-shaped molds, grease them lightly as well. You can also line a baking sheet with parchment paper to place the shaped brains on once they’re done.
2. Measure Out the Rice Bubbles:
Measure 6 cups of Rice Bubbles cereal and set it aside. This will be mixed with the marshmallow mixture later.
Step 2: Melt the Butter and Marshmallows
1. Melt the Butter:
In a large saucepan, melt 1/4 cup of butter over low heat. Stir occasionally to prevent the butter from browning.
2. Add the Marshmallows:
Once the butter is melted, add the entire bag of mini marshmallows to the saucepan. Stir constantly until the marshmallows are completely melted and smooth. This should take about 3-4 minutes.
3. Add Vanilla and Food Coloring:
Once the marshmallows are fully melted, stir in 1 teaspoon of vanilla extract for extra flavor. If you want to give the brains a fleshy or bloody tone, add a few drops of red or pink food coloring and stir until the mixture is evenly colored.
Step 3: Mix the Marshmallow and Rice Bubbles
1. Combine the Marshmallow and Cereal:
Remove the saucepan from the heat and immediately add the Rice Bubbles cereal to the melted marshmallow mixture. Stir quickly and thoroughly until all of the cereal is evenly coated with the marshmallow mixture. It’s important to do this step quickly before the marshmallow mixture cools down and starts to harden.
2. Let the Mixture Cool Slightly:
Allow the mixture to cool slightly for about 2-3 minutes. This will make it easier to shape without burning your hands, but make sure it’s still pliable.
Step 4: Shape the Brains
1. Form Brain Shapes:
Once the mixture is cool enough to handle, start shaping it into brain-like mounds. Take a handful of the mixture (about 1/4 cup per brain) and form it into an oval shape, roughly resembling the size of a small brain. You can press lightly in the center to create the appearance of the two brain hemispheres. If you’re using brain-shaped molds, press the mixture into the molds instead.
2. Place on Baking Sheet:
As you shape the brains, place them on the prepared baking sheet lined with parchment paper. Let them cool and set for about 15-20 minutes before decorating.
Step 5: Decorate the Brains
Now that your marshmallow brains are shaped, it’s time to make them look extra spooky with some decorations!
1. Add Blood Effect:
Use red decorating gel or red icing to create a blood effect on the brains. You can drizzle the red gel over the tops of the brains or pipe it into the grooves to resemble blood veins. The more haphazard the blood looks, the spookier the effect!
2. Add Candy Eyes (Optional):
For an extra creepy touch, place candy eyes randomly on the brains, or make one of the brains a cyclops with a single large candy eye in the center. This gives the brains a playful and ghoulish look.
3. Drizzle with White Chocolate (Optional):
If you want to add some extra detail, melt some white chocolate and drizzle it over the brains. You can tint the white chocolate with green food coloring to create a slime-like effect.
4. Sprinkle with Edible Glitter or Sprinkles:
For a fun twist, sprinkle the brains with edible glitter or Halloween-themed sprinkles. This adds a bit of sparkle and makes them even more festive.
Step 6: Serve and Enjoy!
Once your Marshmallow Rice Bubbles Halloween Brains are fully decorated, they’re ready to serve! These treats are best enjoyed the same day while they’re still fresh and gooey. Serve them on a Halloween-themed platter or create a spooky display by placing them in a brain-shaped serving bowl.
How to Serve
- At a Halloween Party: These marshmallow brains are perfect for a Halloween party. Place them on a serving platter with other spooky treats like cupcakes decorated as spiders, skeleton cookies, or bowls of candy. You can even surround the brains with gummy worms or fake spiders for added effect.
- For Trick-or-Treaters: Wrap individual marshmallow brains in plastic wrap and give them out to trick-or-treaters for a homemade, spooky surprise.
- As a Halloween Dessert: These brains make a fun Halloween-themed dessert for kids or adults. Serve them after a Halloween dinner or at a family gathering while everyone’s in costume!
- With a Movie Night: Pair these marshmallow brains with a spooky movie marathon for a Halloween movie night treat. They’re great finger foods to munch on while watching your favorite scary movies.
Additional Tips for Success
- Work Quickly: The marshmallow mixture sets fairly quickly, so be sure to shape the brains while the mixture is still warm and pliable. If it starts to harden, you can reheat the mixture in the microwave for a few seconds to soften it up again.
- Use Butter or Non-Stick Spray: To prevent the marshmallow mixture from sticking to your hands, lightly coat your hands with butter or non-stick spray before shaping the brains. This will make the process much easier.
- Customize the Colors: If you want your brains to look even more realistic, use a combination of food colorings (red, pink, and green) to give the marshmallow mixture a more lifelike, fleshy appearance.
- Try Different Molds: If you have Halloween-themed molds (such as brains or skulls), use those to shape the marshmallow mixture instead of forming it by hand. These molds can help create more intricate and realistic shapes.
- Add Mix-Ins: For added texture, consider mixing in some small candies, chocolate chips, or crushed cookies with the Rice Bubbles before shaping the brains. These additions will make the treats even more delicious and fun to eat.
Recipe Variations
This basic recipe for Marshmallow Rice Bubbles Halloween Brains is incredibly versatile, and you can easily modify it to suit your preferences. Here are a few variations to try:
1. Chocolate Rice Bubbles Brains:
For a chocolatey twist, use chocolate-flavored Rice Bubbles or add a few tablespoons of cocoa powder to the melted marshmallow mixture before mixing in the cereal. This will give the brains a rich, chocolatey flavor that’s perfect for chocolate lovers.
2. Fruity Halloween Brains:
To add a fruity flavor, use fruity-flavored marshmallows or mix in a few drops of fruit extract (like orange, raspberry, or strawberry) into the melted marshmallow mixture. You can also use different colors of food coloring to create bright, neon-colored brains.
3. Monster Brains with Gummy Worms:
For an extra creepy effect, add gummy worms or gummy snakes to the marshmallow mixture before shaping the brains. You can have the gummy worms sticking out of the brains for a gross, yet fun, Halloween twist.
4. Vegan Marshmallow Brains:
To make this recipe vegan, use vegan marshmallows (which are gelatin-free) and vegan butter. The result will be just as delicious and gooey but completely plant-based.
5. Blood Orange Brains:
For a citrusy twist, add a few drops of blood orange extract to the marshmallow mixture and tint the brains with orange food coloring. This will give the brains a tangy, fruity flavor and a fun, blood-orange color.
Freezing and Storage
Storing Leftovers:
Store any leftover Marshmallow Rice Bubbles Brains in an airtight container at room temperature for up to 3-4 days. These treats are best when eaten fresh, but they’ll still be delicious after a few days. Make sure they’re stored in a cool, dry place to prevent the marshmallow from becoming too sticky.
Freezing:
If you want to make these treats ahead of time, you can freeze them! Place the shaped brains in a single layer on a baking sheet and freeze until solid. Once frozen, transfer the brains to a freezer-safe container or plastic bag. Freeze for up to 1 month. To serve, let the brains thaw at room temperature for about 30 minutes before eating.
Special Equipment
- Large saucepan: For melting the butter and marshmallows.
- Parchment paper or silicone mat: To place the shaped brains on while they cool and set.
- Brain-shaped molds: If you want to create more intricate brain shapes (optional).
- Decorating tools: Such as piping bags for the red icing or gel to create the blood effect.
Frequently Asked Questions
1. Can I use large marshmallows instead of mini marshmallows?
Yes! You can use large marshmallows instead of mini marshmallows, but they may take a bit longer to melt. Use the same amount (about 10 oz/300g) and melt them as you would the mini marshmallows.
2. Can I make these treats ahead of time?
Absolutely! You can make the marshmallow brains a day or two in advance. Just store them in an airtight container at room temperature until you’re ready to serve them.
3. How do I prevent the marshmallow mixture from sticking to my hands?
To prevent the sticky marshmallow mixture from sticking to your hands, lightly coat your hands with butter or non-stick spray before shaping the brains. You can also use wax paper or plastic gloves for easier handling.
4. Can I use food coloring gel instead of liquid food coloring?
Yes! Food coloring gel works great for coloring the marshmallow mixture, and it’s often more concentrated than liquid food coloring. You’ll need just a small amount to achieve the desired color.
5. How can I make the brains look more realistic?
To make the brains look more realistic, use a brain-shaped mold or shape the brains with more detail by hand. You can also mix several shades of food coloring (like red, pink, and green) to create a more lifelike color for the brains. Adding candy eyes or gummy worms can also enhance the spooky, realistic effect.
Conclusion
Marshmallow Rice Bubbles Halloween Brains are the perfect combination of spooky and sweet, making them an ideal treat for Halloween. These sticky, chewy, brain-shaped treats are easy to make, fun to decorate, and guaranteed to delight both kids and adults alike. Whether you’re throwing a Halloween party, looking for a creative dessert to share, or just want to enjoy a playful, festive snack, these marshmallow brains are sure to steal the show.
With the added bonus of being customizable, you can easily adapt this recipe to suit your preferences, whether that’s adding a fruity twist, making them vegan, or decorating them with all sorts of Halloween-themed candies. I hope you enjoy making and serving these spooky treats as much as I do!
Print
Marshmallow Rice Bubbles Halloween Brains
- Total Time: 20-25 minutes
- Yield: Makes 12-15 brains (depending on size) 1x
Ingredients
For the Brains:
- 6 cups Rice Bubbles cereal (or any puffed rice cereal)
- 1/4 cup butter (unsalted)
- 1 bag (10 oz/300g) mini marshmallows
- 1 teaspoon vanilla extract
- A few drops of red or pink food coloring (optional, to give the brains a fleshy tone)
For Decoration:
- Red decorating gel or red icing (for the blood effect)
- Candy eyes (optional, for extra creepy flair)
- White chocolate, melted (optional, for drizzling)
- Green food coloring (optional, to tint the white chocolate or icing)
- Edible glitter or sprinkles (optional, to make the brains extra fun)
Optional Add-Ins:
- Crushed candy or chocolate chips, for texture and added flavor
- Shredded coconut for a different texture (can also be colored with food dye)
- Candy worms or gummy worms, to poke out of the brains for an extra creepy effect
Instructions
Step 1: Prepare the Work Surface and Ingredients
1. Grease Your Hands or Molds:
Marshmallow treats can get sticky! Lightly grease your hands with butter or non-stick spray before shaping the brains. If you’re using brain-shaped molds, grease them lightly as well. You can also line a baking sheet with parchment paper to place the shaped brains on once they’re done.
2. Measure Out the Rice Bubbles:
Measure 6 cups of Rice Bubbles cereal and set it aside. This will be mixed with the marshmallow mixture later.
Step 2: Melt the Butter and Marshmallows
1. Melt the Butter:
In a large saucepan, melt 1/4 cup of butter over low heat. Stir occasionally to prevent the butter from browning.
2. Add the Marshmallows:
Once the butter is melted, add the entire bag of mini marshmallows to the saucepan. Stir constantly until the marshmallows are completely melted and smooth. This should take about 3-4 minutes.
3. Add Vanilla and Food Coloring:
Once the marshmallows are fully melted, stir in 1 teaspoon of vanilla extract for extra flavor. If you want to give the brains a fleshy or bloody tone, add a few drops of red or pink food coloring and stir until the mixture is evenly colored.
Step 3: Mix the Marshmallow and Rice Bubbles
1. Combine the Marshmallow and Cereal:
Remove the saucepan from the heat and immediately add the Rice Bubbles cereal to the melted marshmallow mixture. Stir quickly and thoroughly until all of the cereal is evenly coated with the marshmallow mixture. It’s important to do this step quickly before the marshmallow mixture cools down and starts to harden.
2. Let the Mixture Cool Slightly:
Allow the mixture to cool slightly for about 2-3 minutes. This will make it easier to shape without burning your hands, but make sure it’s still pliable.
Step 4: Shape the Brains
1. Form Brain Shapes:
Once the mixture is cool enough to handle, start shaping it into brain-like mounds. Take a handful of the mixture (about 1/4 cup per brain) and form it into an oval shape, roughly resembling the size of a small brain. You can press lightly in the center to create the appearance of the two brain hemispheres. If you’re using brain-shaped molds, press the mixture into the molds instead.
2. Place on Baking Sheet:
As you shape the brains, place them on the prepared baking sheet lined with parchment paper. Let them cool and set for about 15-20 minutes before decorating.
Step 5: Decorate the Brains
Now that your marshmallow brains are shaped, it’s time to make them look extra spooky with some decorations!
1. Add Blood Effect:
Use red decorating gel or red icing to create a blood effect on the brains. You can drizzle the red gel over the tops of the brains or pipe it into the grooves to resemble blood veins. The more haphazard the blood looks, the spookier the effect!
2. Add Candy Eyes (Optional):
For an extra creepy touch, place candy eyes randomly on the brains, or make one of the brains a cyclops with a single large candy eye in the center. This gives the brains a playful and ghoulish look.
3. Drizzle with White Chocolate (Optional):
If you want to add some extra detail, melt some white chocolate and drizzle it over the brains. You can tint the white chocolate with green food coloring to create a slime-like effect.
4. Sprinkle with Edible Glitter or Sprinkles:
For a fun twist, sprinkle the brains with edible glitter or Halloween-themed sprinkles. This adds a bit of sparkle and makes them even more festive.
Step 6: Serve and Enjoy!
Once your Marshmallow Rice Bubbles Halloween Brains are fully decorated, they’re ready to serve! These treats are best enjoyed the same day while they’re still fresh and gooey. Serve them on a Halloween-themed platter or create a spooky display by placing them in a brain-shaped serving bowl.
- Prep Time: 15 minutes
- Cook Time: 5 minutes
Nutrition
- Serving Size: 1 brain per person
- Calories: 180 kcal
- Sugar: 25g
- Fat: 3g
- Carbohydrates: 38g
- Fiber: 0g
- Protein: 1g